星期六, 12月 31, 2022

[HiNet] 轉址服務

公司有網域不使用,但之前已經有撒出去文宣品上有 QRCode 和該網域網址,交代網路小白的我來研究如何進行轉址,基本上跟著 HiNet 官方說明就可以完成設定,一開始上網 Google 時,轉址服務這關鍵字找到的大多是跨境店商說明如何把網域掛上網站說明,紀錄一下免得未來被指派任務時又要重新來一遍

Hinet 官方 QA

官方說明 就很詳細,設定完成耐心等待就會成功,DNS 與轉址 => Q12 - Q14 為轉址相關說明,如下圖

[Hinet] 轉址服務-1


轉址服務設定

1. HiNet DNS 代管設定:要設定 Hinet 轉址主機 A 紀錄

把舊網域設定到轉址主機,一開始以為官方說明上的 IP 只是一個範例 IP,想說真正轉址主機 IP 要去哪裡取得,別懷疑係真ㄟ,另外官方說明有提到可以 socal media 的轉址設定,就也一併設定

[Hinet] 轉址服務-2


2. 轉址服務:設定轉址 (來源網址、目的網址)

設定好來源網址和目的網址後,官方說明 30 分鐘會生效,但在 DNS 內的 [轉址主機 A 紀錄] 也生效時才會運作,之前目小只注意到 30 分鐘生效,一直以為設定錯誤,怎麼都沒有進行轉址,忽略 DNS 紀錄官方說明是 6 - 24 小時內生效

[Hinet] 轉址服務-3


經過以上兩步驟就完成轉址服務設定

星期五, 12月 23, 2022

[RV] 並未將物件參考設定為物件的執行個體

寫報表時跑出來的錯誤訊息 - 並未將物件參考設定為物件的執行個體,訊息截圖如下
 
[SSRS] 並未將物件參考設定為物件的執行個體
去查發現 C# 報表路徑設定異常,副檔名 rdlc 竟然輸入了兩次,導致找不到報表,修正就會正常啦
ReportViewer.LocalReport.ReportEmbeddedResource = "修正後報表路徑"

星期日, 12月 04, 2022

[json] 序列化、反序列化

之前接 API 時,有用 Json.NET 的 JObject 直接抓目標資料,這次心血來潮老老實實的把該對應 class 建出來,反序列化一直出問題,最後還是透過 [VS] 選擇性貼上 功能把對應 class 自動建立出來,才發現腦殘的點在哪,Orz

在 LinqPad 上筆記該範例作為借鏡
void Main()
{
	MasterClass demoData = new MasterClass()
	{
		MasterProp = "MasterProp",
		InnerClass = new InnerClass() { InnerProp1 = "InnerProp1", InnerProp2 = "InnerProp2", InnerProp3 = "InnerProp3" },
		DetailMasterClass = new DetailMasterClass()
		{
			DetailMasterProp = "dmProp",
			DetailClass = new List<DetailClass>()
			{
				new DetailClass(){DetailProp1 = "dProp1" , DetailProp2 = "dProp2"},
				new DetailClass(){DetailProp1 = "dProp11" , DetailProp2 = "dProp22"},
			}
		}
	};

	// 序列化
	string jsonData = JsonConvert.SerializeObject(demoData);
	jsonData.Dump("序列化");

	// 反序列化-方法一
	JObject jsonObject = JObject.Parse(jsonData);
	string records = jsonObject[nameof(MasterClass.DetailMasterClass)][nameof(DetailClass)].ToString();
	List<DetailClass> result = JsonConvert.DeserializeObject<List<DetailClass>>(records);
	result.Dump("使用 JObject 取 DetailClass 資料");

	// 反序列化-方法二
	var descJson = JsonConvert.DeserializeObject<MasterClass>(jsonData);
	descJson.Dump("完整 json 資料");
	descJson.DetailMasterClass.DetailClass.Dump("只取 DetailClass 資料");
}

public class MasterClass
{
	public string MasterProp { get; set; }

	public InnerClass InnerClass { get; set; }

	public DetailMasterClass DetailMasterClass { get; set; }
}

public class InnerClass
{
	public string InnerProp1 { get; set; }
    
	public string InnerProp2 { get; set; }
    
	public string InnerProp3 { get; set; }
}

public class DetailMasterClass
{
	public string DetailMasterProp { get; set; }

	public List<DetailClass> DetailClass { get; set; }
}

public class DetailClass
{
	public string DetailProp1 { get; set; }
    
	public string DetailProp2 { get; set; }
}
Json Init 內格式化 json 資料,方便閱讀

[json] 序列化、反序列化-1

LinqPad 輸出的完整資料

[json] 序列化、反序列化-2

星期六, 11月 26, 2022

[SSMS] 此後端版本不支援設計資料庫圖表或資料表

安裝 SQL Server 2022 來使用,沒想到使用 SSMS V18.12.1 去操作時,竟然出現該訊息
此後端版本不支援設計資料庫圖表或資料表 (the-backend-version-is-not-supported-to-design-database-diagrams-or-tables)

[SSMS] 此後端版本不支援設計資料庫圖表或資料表

SSMS 下載 頁面內發現該文字說明
This version of SSMS works with all supported versions of SQL Server 2008 - SQL Server 2019 (15.x) and provides the greatest level of support for working with the latest cloud features in Azure SQL Database and Azure Synapse Analytics.
原來 SSMS V18 只支援 SQL Server 2008 - 2019 而已,最後只能安裝 SSMS V19 Preview3 來搭配 SQL Server 2022 囉

星期二, 11月 22, 2022

紙匣預設紙張

使用者回報告知,列印輸出時都必須去按印表機 OK 按鈕後才會出紙,畫面如下

訊息一:裝入 1 號紙匣。普通紙 A4

紙匣預設紙張-1

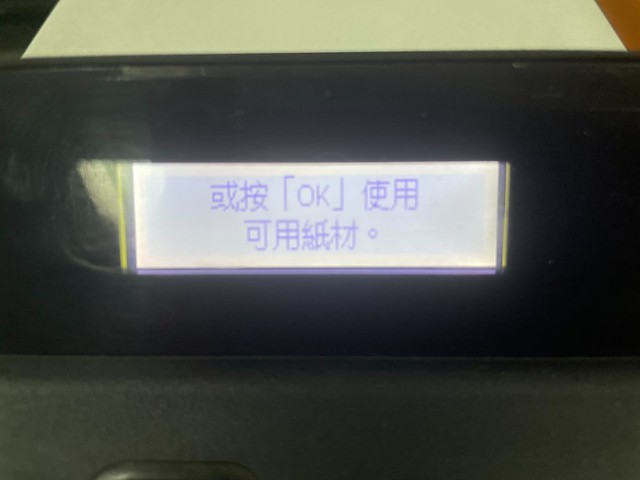
訊息二:或按 [OK] 使用可用紙材。

  紙匣預設紙張-2

經過確認後發現,紙匣預設紙張竟然是 A5,修正為 A4 後就恢復正常 

紙匣預設紙張-3

星期三, 11月 09, 2022

[VS] 啟用到反向組譯來源的瀏覽

使用 VS2022 時有注意到,按 F12 行為有變化,現在可以直接看到 source code,在社群討論時發現該功能是可以設定的

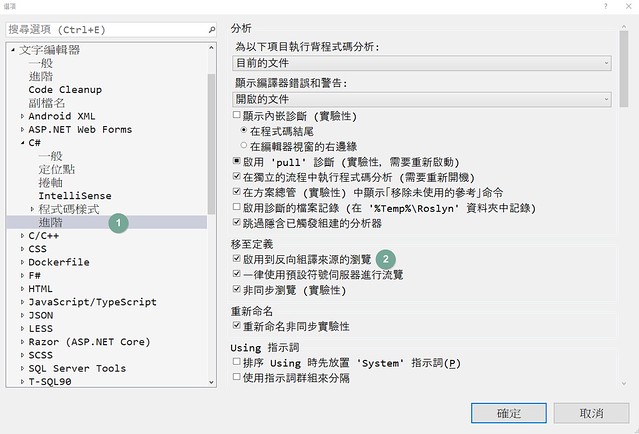
工具 => 選項 => 文字編輯器 => C# => 進階 => 移至定義 => 啟用到反向組譯來源的瀏覽

  啟用到反向組譯來源的瀏覽

星期日, 10月 30, 2022

[EF] Transaction

閱讀 EF6 官方文章 - 使用交易 的整理筆記,紀錄最常用的兩種方式,分別為
  • SaveChange()、Database.ExecuteSqlCommand()
  • BeginTransaction()

環境建置

在 AdventureWorks2019 內建立 EFTransaction Table 來存放資料,並開啟 SQL Profile 來觀察交易

EFTransacton Table Script
USE [AdventureWorks2019]
GO

CREATE TABLE [dbo].[EFTransaction]
(
	[ID] [int] IDENTITY(1,1) NOT NULL,
	[RecordTime] [datetime] NULL,
	CONSTRAINT [PK_EFTransaction] PRIMARY KEY CLUSTERED 
	(
		[ID] ASC
	)
)
Profile 內開啟交易事件

[EF] Transaction-1


SaveChange()、Database.ExecuteSqlCommand()

SaveChange() 和 Database.ExecuteSqlCommand() 預設都會開啟交易,隔離層級為資料庫預設層級,以 MS SQL 為例,預設隔離層級是 read committed
DbFirstDbContext dbFirstDbContext = new DbFirstDbContext();
dbFirstDbContext.EFTransaction.Add(new EFTransaction() { RecordTime = DateTime.Now });
dbFirstDbContext.SaveChanges();

string TSQL = "DELETE FROM EFTransaction WHERE RecordTime < getdate()";
dbFirstDbContext.Database.ExecuteSqlCommand(TSQL);
從下圖 profile 截圖可以觀察到,SaveChange() 和 Database.ExecuteSqlCommand() 都包在各自的交易內,且從 Audit Login 內可以看到 read committed
 
[EF] Transaction-2

BeginTransaction()

BeginTransaction() 可以把多個資料庫操作包在同一個交易內,以上述的 SaveChange() 和 Database.ExecuteSqlCommand() 來觀察
using (DbFirstDbContext dbFirstDbContext = new DbFirstDbContext())
using (DbContextTransaction tran = dbFirstDbContext.Database.BeginTransaction(System.Data.IsolationLevel.ReadCommitted))
{
    dbFirstDbContext.EFTransaction.Add(new EFTransaction() { RecordTime = DateTime.Now });
    dbFirstDbContext.SaveChanges();

    string TSQL =
        "insert into EFTransaction (RecordTime)" +
        " values(getdate())";
    dbFirstDbContext.Database.ExecuteSqlCommand(TSQL);

    tran.Commit();
}

從下圖 profile 截圖可以觀察到,SaveChange() 和 Database.ExecuteSqlCommand() 的 insert 動作都包在同一個交易內,且從 Audit Login 內可以看到 read committed

[EF] Transaction-3

另外透過 BeginTranaction() 來開啟交易,是可以明確指定交易層級的,該範例雖然有明確指定 read committed,但 read committed 是預設值 

文章內關於 BeginTransaction() 的備註說明
Database.BeginTransaction() will open the connection if it is not already opened. If DbContextTransaction opened the connection then it will close it when Dispose() is called.

星期四, 10月 20, 2022

[SQL] 作業失敗

收到 Job fail mail 通知,是偵測 block 超過設定時間並收集相關資訊的 job 發生異常

收到的通知 mail   

[SQL] 作業失敗-2

SQL Agent 內查到的錯誤訊息

[SQL] 作業失敗-1

錯誤訊息
轉換 expression 到資料類型 int 時發生算術溢位錯誤。 [SQLSTATE 22003] (錯誤 8115) 陳述式已經結束。 [SQLSTATE 01000] (錯誤 3621)
情況筆記

該 Job 會把捕捉到的 block 資訊 insert 進特定 table 內留存,方便事後分析,從錯誤訊息來看是資料要 insert 進 int 欄位時發生錯誤,從文件上確認 DMV 資料型別發現,原來 sys.dm_os_waiting_tasks wait_duration_ms 欄位是 bigint,但是收集 table 上是開 int,收到 mail 通知時有趕快去 product 上手動執行 DMV 語法查 block,有重現該 insert 錯誤

其實不知道為什麼會發生錯誤,因為 wait_duration_ms 沒有破 int 大小限制,然後 table 內有很多資料都比抓到的 wait_duration_ms 還要大,不知道 SQL Server 內部到底轉換了甚麼 ,反正該機制有回復正常就好

星期三, 10月 19, 2022

[SSRS] A data source instance has not been supplied

改報表時有變更 SSRS 內的 data source,然後報表拋出下面訊息

[SSRS] A data source instance has not been supplied
後來發現 C# 內設定的 data source 和 SSRS 內不一致造成,修正後報表就正常顯示啦
ReportViewer.LocalReport.DataSources.Add(new ReportDataSource(name, dataSourceValue));
久久碰一次報表常常會莫名卡關

星期二, 10月 18, 2022

[SSRS] 報表資料

開啟 VS 要開發 SSRS 時,突然發現 [報表資料]視窗不見,下意識去 [VS 檢視] 內要把它叫出來,竟然找不到,傻眼

[SSRS] 報表資料-2

在官方文件 - 停駐報表設計師中的報表資料窗格 內有找到快捷鍵 - [Ctrl + Alt + D] 把視窗叫出來,Google 時有發現該篇討論,在叫出報表視窗時也有發現到 [VS 檢視] 內的 [報表資料] 選項時有時無,話說這討論背景是 VS 2010,我現在用的是 VS2022,Orz

星期三, 10月 12, 2022

[VS] 偵錯 - 區域變數

跟同事 PC 上討論時,偵錯時慣性去看 [區域變數] 視窗觀察變數值,但當下一直找不到它在哪,該篇紀錄開啟步驟

偵錯模式 => 偵錯 => 視窗 => 區域變數

[VS] 偵錯 - 區域變數

星期一, 10月 10, 2022

[SQL] 查詢 Table 資料筆數

常看見社群上提到使用 count() 來查詢 Table 資料筆數,該篇紀錄查詢資料筆數的兩種方式,以 AdventureWorks2019 的 Person Table 當成查詢目標紀錄

SSMS 上操作

Person Table => 滑鼠右鍵 => 儲存體 => 資料列計數


Person Table => 統計資訊 => 任一統計資訊 (該範例以 PK 為主) => 滑鼠右鍵 => 統計資訊詳細資料


單一 Table 沒有切割任何 parition

使用 sys.partition 來查詢資料筆數,而在 sys.dm_db_partition_stats 內有該備註說明
If a heap or index is not partitioned, it is made up of one partition (with partition number = 1); therefore, only one row is returned for that heap or index. The sys.partitions catalog view can be queried for metadata about each partition of all the tables and indexes in a database.
SELECT
    T.[name] AS 資料表名稱,
    P.rows AS 資料筆數
FROM sys.tables AS T  
	JOIN sys.partitions AS P ON T.[object_id] = P.[object_id]
WHERE P.index_id IN (0,1) -- 0:代表 Heap、1 代表 Clustered Index
    AND T.[name] = 'Person' 
ORDER BY 資料筆數 DESC

星期五, 10月 07, 2022

[SQL] 資料表值建構函式 - 跨欄位彙總

網路上發現的報表彙總問題,問題為申請流程會有三道文件申請
  • 每道文件申請彼此之間沒有順序性
  • 每道文件申請會有多次通過紀錄,必須找出最早審核通過日期
  • 完成三道文件申請後,要顯示最後該文件完成日期
原始資料和預期結果如下

[SQL] 資料表值建構函式 - 跨欄位彙總-1

練習時雖然有達到需求但很亂,Google 到該篇文章 - Find MAX value from multiple columns in a SQL Server table,打開資料表值建構函式應用視野,以前對於資料表值建構函式使用都僅止 [SQL] 資料表值建構函式,這次才發現衍伸資料表使用方式,可以達到跨欄位彙總

TSQL 和說明如下
DECLARE @申請文件 TABLE
(
	[文件ID] CHAR(20),
	[顧客ID] CHAR(9),
	[文件類型] CHAR(1),
	[文件申請日期] DATE,
	[文件審核日期] DATE,
	[審核結果] NCHAR(6)
);

INSERT INTO @申請文件 VALUES 
----- 原問題資料
('xxxxxxxxxxxx', 'xxxx-0001', 'A', '2022/01/01', '2022/01/22', N'通過'),
('xxxxxxxxxxxx', 'xxxx-0001', 'A', '2022/02/15', '2022/02/19', N'通過'),
('xxxxxxxxxxxx', 'xxxx-0001', 'A', '2022/03/01', '2022/03/05', N'不通過'),
('xxxxxxxxxxxx', 'xxxx-0001', 'B', '2022/02/01', '2022/02/20', N'不通過'),
('xxxxxxxxxxxx', 'xxxx-0001', 'B', '2022/03/01', '2022/03/22', N'通過'),
('xxxxxxxxxxxx', 'xxxx-0001', 'C', '2022/01/15', '2022/01/22', N'不通過'),
('xxxxxxxxxxxx', 'xxxx-0001', 'C', '2022/02/20', '2022/02/27', N'通過'),
('xxxxxxxxxxxx', 'xxxx-0002', 'A', '2022/05/01', '2022/05/06', N'通過'),
('xxxxxxxxxxxx', 'xxxx-0002', 'B', '2022/05/20', '2022/05/22', N'通過'),
('xxxxxxxxxxxx', 'xxxx-0002', 'B', '2022/05/15', '2022/05/17', N'通過'),
('xxxxxxxxxxxx', 'xxxx-0002', 'C', '2022/05/15', '2022/05/18', N'通過'),
('xxxxxxxxxxxx', 'xxxx-0003', 'A', '2022/03/20', '2022/03/22', N'通過'),
('xxxxxxxxxxxx', 'xxxx-0003', 'B', '2022/03/14', '2022/03/20', N'通過'),
('xxxxxxxxxxxx', 'xxxx-0003', 'B', '2022/06/01', '2022/06/22', N'不通過'),
('xxxxxxxxxxxx', 'xxxx-0003', 'B', '2022/07/30', '2022/07/31', N'通過'),
('xxxxxxxxxxxx', 'xxxx-0003', 'C', '2022/03/14', '2022/03/15', N'通過'),
----- 故意建立一筆沒有完成流程資料
('xxxxxxxxxxxx', 'xxxx-0004', 'A', '2022/03/14', '2022/03/15', N'通過');

WITH CTE AS 
(
  SELECT *
  FROM
    (
      SELECT
        [文件ID] ,
        [顧客ID] ,		
        [文件類型] ,
        [文件審核日期]
      FROM @申請文件
      WHERE [審核結果] = N'通過'
    ) AS P
    PIVOT
    (
      -- 找出 A、B、C 文件申請最早通過日期
      MIN([文件審核日期]) FOR [文件類型] IN ([A] , [B] , [C])
    ) AS PV
)
SELECT 
  T.[文件ID] ,
  T.[顧客ID] ,	
  T.A AS [文件 A 最早通過時間] ,
  T.B AS [文件 B 最早通過時間] ,
  T.C AS [文件 C 最早通過時間] ,
  -- A、B、C 文件申請都過,才算是完整通過
  IIF(A IS NULL OR B IS NULL OR C IS NULL , NULL , LastUpdateDate) AS 最早申請完成時間
FROM
  (
    SELECT
      * ,
      (
        -- 使用衍伸資料表來達到跨欄位取最大日期
        SELECT 
          MAX(LastUpdateDate)
        FROM 
          (
            VALUES (A),(B),(C)            -- A、B、C 為 PIVOT 後的欄位名稱
          ) AS UpdateDate(LastUpdateDate) -- 定義 Table 名稱 (欄位名稱)
      ) AS LastUpdateDate
    FROM CTE
  ) AS T
TSQL 執行結果

星期四, 10月 06, 2022

[SQL] 資料表值建構函式

SQL Server 2008 推出的新語法 - 資料表值建構函式(Table Value Constructor),主要有兩種使用方式,分別為
  • 單一 insert 插入多筆資料 (insert values)
  • 衍伸資料表 (derived table)
單一 insert 插入多筆資料

該作法最常見,常用來取代 insert 資料時,不用一直反覆寫 insert into TableName 這段語法,只要在 values 後面用括號包住資料並用逗號分隔
USE AdventureWorks2019;  
GO  

DECLARE @Table_Value_Constructor TABLE (id int , LastName nchar(4) , FirstName nchar(4))

INSERT INTO @Table_Value_Constructor VALUES 
    (1 , N'張' , N'三'), 
    (2 , N'李' , N'四'),
    (3 , N'王' , N'五');  
GO  
衍伸資料表

values 接括號資料並用逗號分隔後產生 Table 名稱和欄位名稱
SELECT *
FROM 
    (	
        VALUES
        ('20221001', '20221002'),
        ('20221003', '20221004'), 
        ('20221005', '20221006'), 
        ('20221007', '20221008'), 
        ('20221009', '20221010') 
    ) AS Table_Value_Constructor(Date1, Date2);  -- 指定 Table 名稱和欄位名稱

[SQL] 資料表值建構函式

限制事項 from 官方文件
  • 用作衍生資料表時,資料列數目沒有限制。 
  • 作為 INSERT ... VALUES 陳述式的 VALUES 子句時,資料列數目限制為 1000 個。如果資料列數目超過最大值,就會傳回錯誤 10738。 若要插入 1000 個以上的資料列,請使用下列其中一種方法: 
    • 建立多個 INSERT 陳述式 
    • 使用衍生資料表
    • 使用 bcp 公用程式 ( .NET SqlBulkCopy class、OPENROWSET (BULK ...)) 或 BULK INSERT 陳述式來大量匯入資料

星期三, 10月 05, 2022

[SQL] 查詢特定資料庫內的指定欄位

看到 Line 社群內問題當下,直覺是常用的 sys.columns,information_schema 可能是名字比較長,沒有記住過,筆記幫助記憶
USE AdventureWorks2019
GO

SELECT
	object_name([object_id]) AS TableName, 
	name AS ColName
FROM sys.columns 
WHERE name = 'ModifiedDate'
ORDER BY TableName

SELECT
	Table_Name ,
	Column_Name
FROM INFORMATION_SCHEMA.COLUMNS
WHERE Column_Name = 'ModifiedDate'
ORDER BY Table_Name

[SQL] 查詢特定資料庫內的指定欄位

星期一, 10月 03, 2022

[SQL] 錯誤 22022

把之前交易複寫的模擬環境重啟使用,手動執行複寫 Job 要透過散發者把資料傳送到訂閱者上都失敗,從 Agent 提供的錯誤訊息去 Google,錯誤 22022 基本上都是找到 SQL Server Agent 服務沒有啟動,但很肯定服務已正常啟動

[SQL] 錯誤 22022-1

在複寫監視器內才發現真正原因,原來 Node2 雖然有開啟,但是 Hyper-V 上的網路沒有通,抓不到它,把網路設定好後就 Job 也就正常囉

[SQL] 錯誤 22022-2

星期日, 9月 04, 2022

[C#] ComboBoxRenderer

根據官方文章 - ComboBoxRenderer 類別 的筆記,練習時發現原本的 Code 在 Font 變化時,ComboBox Size 不會跟著變化,改寫成透過 MeasureString() 來取得字型高度並設定 ComboBox Size

CustomComboBox Code,CustomComboBox 是繼承 Control 來做的喔
using System.Drawing;
using System.Windows.Forms;
using System.Windows.Forms.VisualStyles;

namespace ComboBoxRendererSample
{
    public class CustomComboBox : Control
    {
        private Size arrowSize;
        private Rectangle arrowRectangle;
        private Rectangle topTextBoxRectangle;    // ComboBox 本身文字顯示
        private Rectangle bottomTextBoxRectangle; // ComboBox 下拉選項文字顯示
        private ComboBoxState textBoxState = ComboBoxState.Normal;
        private ComboBoxState arrowState = ComboBoxState.Normal;

        public Font Font
        {
            get => base.Font;
            set
            {
                base.Font = value;
                Invalidate();
            }
        }

        public CustomComboBox() : base()
        {
            Location = new Point(10, 10);
            Size = new Size(300, 200);
            Font = new Font("微軟正黑體", 20);
            Text = "Click the button";
        }

        // Draw the combo box in the current state.
        protected override void OnPaint(PaintEventArgs e)
        {
            base.OnPaint(e);

            if (ComboBoxRenderer.IsSupported == false)
            {
                Parent.Text = "Visual Styles Disabled";
                return;
            }

            // ComboBox 高度部分改用 MeasureString() 根據字型來調整
            SizeF stringSizeFormat = e.Graphics.MeasureString(Text, Font);
            int Height = (int)stringSizeFormat.Height;

            arrowSize = new Size(18, Height);

            arrowRectangle = new Rectangle(
                ClientRectangle.X + ClientRectangle.Width - arrowSize.Width - 1,
                ClientRectangle.Y + 1,
                arrowSize.Width,
                Height);

            topTextBoxRectangle = new Rectangle(
                ClientRectangle.X,
                ClientRectangle.Y,
                ClientRectangle.Width,
                Height + 2);

            bottomTextBoxRectangle = new Rectangle(
                ClientRectangle.X,
                ClientRectangle.Y + topTextBoxRectangle.Height,
                ClientRectangle.Width,
                topTextBoxRectangle.Height);

            // Always draw the main text box and drop down arrow in their current states
            ComboBoxRenderer.DrawTextBox(e.Graphics, topTextBoxRectangle, Text, Font, textBoxState);

            ComboBoxRenderer.DrawDropDownButton(e.Graphics, arrowRectangle, arrowState);

            // Only draw the bottom text box if the arrow has been clicked
            if (textBoxState == ComboBoxState.Pressed)
            {
                string bottomText = "Using ComboBoxRenderer";
                ComboBoxRenderer.DrawTextBox(e.Graphics, bottomTextBoxRectangle, bottomText, Font, textBoxState);
            }
        }

        protected override void OnMouseDown(MouseEventArgs e)
        {
            base.OnMouseDown(e);

            if (ComboBoxRenderer.IsSupported == false ||
                arrowRectangle.Contains(e.Location) == false)
                return;

            // Draw the arrow in the pressed state.
            arrowState = ComboBoxState.Pressed;

            // The user has activated the combo box.
            if (textBoxState == ComboBoxState.Normal)
            {
                Text = "Clicked!";
                textBoxState = ComboBoxState.Pressed;
            }
            // The user has deactivated the combo box.
            else
            {
                Text = "Click here";
                textBoxState = ComboBoxState.Normal;
            }

            Invalidate();
        }

        protected override void OnMouseUp(MouseEventArgs e)
        {
            base.OnMouseUp(e);

            if (ComboBoxRenderer.IsSupported == false ||
                arrowRectangle.Contains(e.Location) == false)
                return;

            arrowState = ComboBoxState.Normal;
            Invalidate();
        }
    }
}
CustomComboBox 會隨字型變化 Size 且下拉箭頭會在高度中央,該篇個人重點

[C#] ComboBoxRenderer-1

範例執行初始畫面

[C#] ComboBoxRenderer-2

點擊 TextBox 部分不會有反應,必須點擊下拉箭頭

[C#] ComboBoxRenderer-3

再次點擊下拉箭頭,BottomTextBox (這名稱取的有點奇怪) 會收回

[C#] ComboBoxRenderer-4

星期五, 9月 02, 2022

[C#] 調整 AutoResize 設定來觀察文字顯示效果

根據這兩篇官方文章內容
using System;
using System.Drawing;
using System.Windows.Forms;

namespace Sizing
{
    public partial class Form1 : Form
    {
        // 重置功能使用參數
        private DataGridView dataGridView1;
        private string boringMeatloaf = "ground beef";
        private string boringMeatloafRanking = "*";
        private bool boringRecipe;
        private bool shortMode;
        private string thirdColumnHeader = "Main Ingredients";
        private string otherRestaurant = "Gomes's Saharan Sushi";

        public Form1()
        {
            InitializeComponent();

            InitializeDataGridView();
        }

        private void Form1_Load(object sender, EventArgs e)
        {

        }

        #region 初始化相關

        private void btnReset_Click(object sender, EventArgs e)
        {
            Controls.Remove(dataGridView1);
            InitializeDataGridView();
        }

        private void InitializeDataGridView()
        {
            dataGridView1 = new DataGridView();
            dataGridView1.Location = new Point(0, 0);
            dataGridView1.Size = new Size(600, 400);
            Controls.Add(dataGridView1);

            AddColumns();
            PopulateRows();

            shortMode = false;
            boringRecipe = true;

            void AddColumns()
            {
                dataGridView1.ColumnCount = 4;
                dataGridView1.ColumnHeadersVisible = true;

                // 設定 HeaderCell Style
                DataGridViewCellStyle columnHeaderStyle = new DataGridViewCellStyle();
                columnHeaderStyle.BackColor = Color.Aqua;
                columnHeaderStyle.Font = new Font("Verdana", 12, FontStyle.Bold);
                dataGridView1.ColumnHeadersDefaultCellStyle = columnHeaderStyle;

                int colIndex = 0;
                dataGridView1.Columns[colIndex++].Name = "Recipe";
                dataGridView1.Columns[colIndex++].Name = "Category";
                dataGridView1.Columns[colIndex++].Name = thirdColumnHeader;
                dataGridView1.Columns[colIndex++].Name = "Rating";
            }

            void PopulateRows()
            {
                string[] row1 = { "Meatloaf", "Main Dish", boringMeatloaf, boringMeatloafRanking };
                string[] row2 = { "Key Lime Pie", "Dessert", "lime juice, evaporated milk", "****" };
                string[] row3 = { "Orange-Salsa Pork Chops", "Main Dish", "pork chops, salsa, orange juice", "****" };
                string[] row4 = { "Black Bean and Rice Salad", "Salad", "black beans, brown rice", "****" };
                string[] row5 = { "Chocolate Cheesecake", "Dessert", "cream cheese", "***" };
                string[] row6 = { "Black Bean Dip", "Appetizer", "black beans, sour cream", "***" };
                object[] rows = new object[] { row1, row2, row3, row4, row5, row6 };

                foreach (string[] row in rows)
                    dataGridView1.Rows.Add(row);

                foreach (DataGridViewRow row in dataGridView1.Rows)
                {
                    if (row.IsNewRow)
                        break;

                    row.HeaderCell.Value = "Restaurant " + row.Index;
                }
            }
        }

        #endregion

        #region 文字變化相關

        private void btnChangeColumn3Header_Click(object sender, EventArgs e)
        {
            // 設定第三欄位 ColumnHeader 文字說明
            shortMode = !shortMode;
            string headerText = shortMode ? "S" : thirdColumnHeader;
            dataGridView1.Columns[2].HeaderText = headerText;
        }

        private void btnChangeMeatloafRecipe_Click(object sender, EventArgs e)
        {
            // 設定第一筆資料的資料內容
            boringRecipe = !boringRecipe;

            if (boringRecipe)
            {
                SetMeatloaf(boringMeatloaf, boringMeatloafRanking);
            }
            else
            {
                string greatMeatloafRecipe =
                    "1 lb. lean ground beef, "
                    + "1/2 cup bread crumbs, 1/4 cup ketchup,"
                    + "1/3 tsp onion powder, "
                    + "1 clove of garlic, 1/2 pack onion soup mix "
                    + " dash of your favorite BBQ Sauce";

                SetMeatloaf(greatMeatloafRecipe, "***");
            }

            void SetMeatloaf(string recipe, string rating)
            {
                dataGridView1.Rows[0].Cells[2].Value = recipe;
                dataGridView1.Rows[0].Cells[3].Value = rating;
            }
        }

        private void btnChangeRestaurant2_Click(object sender, EventArgs e)
        {
            // 設定第三筆 RowHeader 文字說明
            bool isOtherRestaurant = dataGridView1.Rows[2].HeaderCell.Value.Equals(otherRestaurant);
            string rowHeaderText = isOtherRestaurant ? "Restaurant 2" : otherRestaurant;
            dataGridView1.Rows[2].HeaderCell.Value = rowHeaderText;
        }

        #endregion

        #region AutoResize - Column 相關

        private void btnSizeThirdColumn_Click(object sender, EventArgs e)
        {
            // 設定第三個欄位的 Header 寬度,可以顯示全部內容
            dataGridView1.AutoResizeColumn(2, DataGridViewAutoSizeColumnMode.ColumnHeader);
        }

        private void btnSizeColumnHeaders_Click(object sender, EventArgs e)
        {
            // 設定全部 ColumnHeader 高度
            dataGridView1.AutoResizeColumnHeadersHeight(2);
        }

        private void btnSizeAllColumns_Click(object sender, EventArgs e)
        {
            // 設定全部 Column 寬度可以顯示全部內容
            dataGridView1.AutoResizeColumns(DataGridViewAutoSizeColumnsMode.AllCells);
        }

        #endregion

        #region AutoResize - Row 相關

        private void btnSizeAllRowsandRowHeaders_Click(object sender, EventArgs e)
        {
            // 設定全部 Row 寬度
            dataGridView1.AutoResizeRows(DataGridViewAutoSizeRowsMode.AllCells);
        }

        private void btnSizeFirstRowHeaderUsingAllHeaders_Click(object sender, EventArgs e)
        {
            // 根據第一筆資料來設定 RowHeader 寬度
            dataGridView1.AutoResizeRowHeadersWidth(0, DataGridViewRowHeadersWidthSizeMode.AutoSizeToAllHeaders);
            // 設定 RowHeader 寬度
            // dataGridView1.AutoResizeRowHeadersWidth(DataGridViewRowHeadersWidthSizeMode.AutoSizeToAllHeaders);
        }

        private void btnSizeThirdRow_Click(object sender, EventArgs e)
        {
            // 搭配 btnSizeAllRowsandRowHeaders_Click 才看得出效果
            dataGridView1.AutoResizeRow(2, DataGridViewAutoSizeRowMode.AllCellsExceptHeader);
        }

        private void btnSizeAllRows_Click(object sender, EventArgs e)
        {
            // 搭配 btnSizeAllRowsandRowHeaders_Click 才看得出效果
            dataGridView1.AutoResizeRows(DataGridViewAutoSizeRowsMode.AllCellsExceptHeaders);
        }

        #endregion
    }
}
依執行的畫面,後續截圖為了閱讀方便,會把右側按鈕功能截圖處理
文字變化相關,紀錄每個按鈕變化後的文字
Row 相關變化,依按鈕順序由上而下操作,就可以看出每一個功能對於文字變化,單獨某個按鈕會感覺不出文字效果

星期二, 8月 23, 2022

[EF] Update 語法觀察

延續 [SQL] Foreign Key - Update 觀念,該篇筆記是來觀察 EF 不同 update 方式,產生的 TSQL update 語法是否會包含值沒有變化欄位,透過 SQL Profile 來觀察 TSQL 語法

EF Update 資料方式
using System;
using System.Data.Entity;
using System.Data.Entity.Migrations;
using System.Linq;

namespace EFUpdate
{
    internal class Program
    {
        static void Main(string[] args)
        {
            Random r = new Random(Guid.NewGuid().GetHashCode());
            int days = r.Next(0, 10);

            AdventureWorks2019 context = new AdventureWorks2019();
            
            var entityUpdate = new PurchaseOrderDetail
            {
                PurchaseOrderID = 1,
                PurchaseOrderDetailID = 1,
                DueDate = new DateTime(2011, 4, 30),
                OrderQty = 4,
                ProductID = 1,
                UnitPrice = 58.26m,
                LineTotal = 201.04m,
                ReceivedQty = 3,
                RejectedQty = 0,
                StockedQty = 3,
                // 修改 ModifiedDate
                ModifiedDate = DateTime.Today.AddDays(days)
            };

            #region 方法一:Attach

            context.PurchaseOrderDetail.Attach(entityUpdate);
            context.Entry(entityUpdate).Property(nameof(PurchaseOrderDetail.ModifiedDate)).IsModified = true;
            context.SaveChanges();

            #endregion

            #region 方法二:AddOrUpdate

            context.PurchaseOrderDetail.AddOrUpdate(entityUpdate);
            context.SaveChanges();

            #endregion

            var entityFromDB = context.PurchaseOrderDetail.Single(p => p.PurchaseOrderID == 1);

            #region 方法三:直接更新

            entityFromDB.ProductID = 1;
            entityFromDB.ModifiedDate = DateTime.Today.AddDays(days);
            context.SaveChanges();

            #endregion

            #region 方法四:設定 EntityState

            entityFromDB.ModifiedDate = DateTime.Today.AddDays(days);
            context.Entry(entityFromDB).State = EntityState.Modified;
            context.SaveChanges();

            #endregion

            #region 方法五:SetValue

            context.Entry(entityFromDB).CurrentValues.SetValues(entityUpdate);
            context.SaveChanges();

            #endregion

        }
    }
}
接續會把各 EF update 語法和 Profile 側錄到的 TSQL update 並列
 
方法一:Attach
context.PurchaseOrderDetail.Attach(entityUpdate);
context.Entry(entityUpdate).Property(nameof(PurchaseOrderDetail.ModifiedDate)).IsModified = true;
context.SaveChanges();
exec sp_executesql N'UPDATE [Purchasing].[PurchaseOrderDetail]
    SET[ModifiedDate] = @0
    WHERE(([PurchaseOrderID] = @1) AND([PurchaseOrderDetailID] = @2))

    SELECT[LineTotal], [StockedQty]
FROM[Purchasing].[PurchaseOrderDetail]
    WHERE @@ROWCOUNT > 0 AND[PurchaseOrderID] = @1 AND[PurchaseOrderDetailID] = @2',
    N'@0 datetime2(7),@1 int,@2 int',@0 = '2022 - 08 - 29 00:00:00',@1 = 1,@2 = 1
方法二:AddOrUpdate
context.PurchaseOrderDetail.AddOrUpdate(entityUpdate);
context.SaveChanges();
exec sp_executesql N'UPDATE [Purchasing].[PurchaseOrderDetail]
    SET[ModifiedDate] = @0
    WHERE(([PurchaseOrderID] = @1) AND([PurchaseOrderDetailID] = @2))

    SELECT[LineTotal], [StockedQty]
FROM[Purchasing].[PurchaseOrderDetail]
    WHERE @@ROWCOUNT > 0 AND[PurchaseOrderID] = @1 AND[PurchaseOrderDetailID] = @2',
    N'@0 datetime2(7),@1 int,@2 int',@0 = '2022 - 08 - 26 00:00:00',@1 = 1,@2 = 1
方法三:直接更新
entityFromDB.ProductID = 1;
entityFromDB.ModifiedDate = DateTime.Today.AddDays(days);
context.SaveChanges();
exec sp_executesql N'UPDATE [Purchasing].[PurchaseOrderDetail]
    SET[ModifiedDate] = @0
    WHERE(([PurchaseOrderID] = @1) AND([PurchaseOrderDetailID] = @2))

    SELECT[LineTotal], [StockedQty]
FROM[Purchasing].[PurchaseOrderDetail]
    WHERE @@ROWCOUNT > 0 AND[PurchaseOrderID] = @1 AND[PurchaseOrderDetailID] = @2',
    N'@0 datetime2(7),@1 int,@2 int',@0 = '2022 - 08 - 24 00:00:00',@1 = 1,@2 = 1
方法四:設定 EntityState
entityFromDB.ModifiedDate = DateTime.Today.AddDays(days);
context.Entry(entityFromDB).State = EntityState.Modified;
context.SaveChanges();
exec sp_executesql N'UPDATE [Purchasing].[PurchaseOrderDetail]
    SET[DueDate] = @0, [OrderQty] = @1, [ProductID] = @2, [UnitPrice] = @3, [ReceivedQty] = @4, [RejectedQty] = @5, [ModifiedDate] = @6
    WHERE(([PurchaseOrderID] = @7) AND([PurchaseOrderDetailID] = @8))

    SELECT[LineTotal], [StockedQty]
FROM[Purchasing].[PurchaseOrderDetail]
    WHERE @@ROWCOUNT > 0 AND[PurchaseOrderID] = @7 AND[PurchaseOrderDetailID] = @8',
    N'@0 datetime2(7),@1 smallint,@2 int,@3 decimal(19, 4),@4 decimal(8, 2),@5 decimal(8, 2),@6 datetime2(7),@7 int,@8 int',@0 = '2011 - 04 - 30 00:00:00',@1 = 4,@2 = 1,@3 = 58.2600,@4 = 3.00,@5 = 0,@6 = '2022 - 08 - 23 00:00:00',@7 = 1,@8 = 1

方法五:SetValue
context.Entry(entityFromDB).CurrentValues.SetValues(entityUpdate);
context.SaveChanges();
exec sp_executesql N'UPDATE [Purchasing].[PurchaseOrderDetail]
    SET[ModifiedDate] = @0
    WHERE(([PurchaseOrderID] = @1) AND([PurchaseOrderDetailID] = @2))

    SELECT[LineTotal], [StockedQty]
FROM[Purchasing].[PurchaseOrderDetail]
    WHERE @@ROWCOUNT > 0 AND[PurchaseOrderID] = @1 AND[PurchaseOrderDetailID] = @2',
    N'@0 datetime2(7),@1 int,@2 int',@0 = '2022 - 08 - 23 00:00:00',@1 = 1,@2 = 1

從上述可以發現,只有 [方法四:設定 EntityState] 會產生全部更新欄位,其他都能自動識別資料本身是否有異動

星期一, 8月 22, 2022

[SQL] Foreign Key - Update

在前兩篇分別就 [SQL] Foreign Key - Delete 和 [SQL] Foreign Key - Insert 討論 Foreign Key,該篇紀錄 Update 的影響

以 AdventureWorks2019 Purchasing.PurchaseOrderDetail 為筆記目標 Table 並停用該 Table Trigger,方便觀察執行計畫 ,測試目的為用相同資料更新該筆資料,藉此觀察執行計畫

更新 DueDate 欄位

更新 PurchaseOrderID = 1 的 DueDate 欄位,2011-04-30 為原本資料
UPDATE Purchasing.PurchaseOrderDetail
SET DueDate = '2011-04-30'
WHERE PurchaseOrderID = 1
從執行計畫中可以看出,雖然資料本身沒有變化,但內部是有進行更新動作,不會因為資料沒有變化就沒有作動

[SQL] Foreign Key - Update-1
更新 ProductID 欄位,該欄位有 Foreign Key 關聯

更新 PurchaseOrderID = 1 的 ProductID = 1 欄位,1 為原本資料,但該欄位有 Foreign Key 關聯至Production.Product Table
UPDATE Purchasing.[PurchaseOrderDetail
SET ProductID = 1
WHERE PurchaseOrderID = 1
從執行計畫可以發現先透過 Clustered Index Seek 找到 ProductID = 1 資料後進行更新,更新後還有進 Production.Product Table 內檢查 ProductID = 1 資料是否存在

[SQL] Foreign Key - Update-2

上圖執行計畫 operator Clustered Index Seek 和 Clustered Index Update 之間有四個 Compute Scalar,為了版面就截切掉,方便閱讀執行計畫

結論是資料進行更新時,該欄位資料若是沒有異動,就不要出現在更新欄位內,若更新欄位存在又有 Foreign Key 相依,會去檢查資料是否存在,資料沒有變化卻又再次進行檢查

星期日, 8月 14, 2022

[C#] ImageListView - 拖放功能

在 ImageListView 套件有內建檔案拖放功能,只要開啟就可以無腦使用,不用再去寫 DragEnter、DragDrop 等相關拖放事件,可以參考之前筆記

C# Code 開啟拖放功能
// 從控件內複製出來
imageListView1.AllowDrag = true;

// 拖曳進去控件
imageListView1.AllowDrop = true;

拖放效果


以系統管理員身分執行


根據 ImageListView 官方提供測試程式,確實只要開啟 AllowDrop 和 AllowDrag 就可以使用檔案拖放功能,但是整理範例筆記時發現,竟然只能使用 drag,drop 無法使用,追究原因發現,原來我開啟 VS 是以系統管理員身分執行,新專案在提高權限後的安全性和 Windows 安全性不一致而無法把檔案拖放進 ImageListView 內,詳見 MS 官方文件說明 - Q: Why Doesn’t Drag-and-Drop work when my Application is Running Elevated? – A: Mandatory Integrity Control and UIPI,該限制跟 ImageListView 無關,即使是 WinForm 標準控件,也會有該限制

要避免安全性不一致導致無法進行 drop,可以參考該文章內的 Code - WinForm中管理员权限下获取拖拽文件路径的解决方案

星期六, 8月 13, 2022

[C#] ImageListView

公司內部 ERP 使用該套件 - ImageListView 來顯示圖檔,根據官方文章來筆記基礎功能,了解有那些功能可以使用,紀錄版本為 V13.8.2

C# Code 紀錄
using Manina.Windows.Forms;
using Manina.Windows.Forms.ImageListViewRenderers;
using System;
using System.Data;
using System.Drawing;
using System.IO;
using System.Linq;
using System.Windows.Forms;

namespace ImageListViewSample
{
    public partial class Form1 : Form
    {
        public Form1()
        {
            InitializeComponent();

            // 預設為 View.Thumbnails
            imageListView1.View = Manina.Windows.Forms.View.Thumbnails;

            // 預設為 true
            imageListView1.MultiSelect = true;

            // 是否允許檔案重覆,預設為 false
            imageListView1.AllowDuplicateFileNames = false;

            // 是否允許調整相片順序,預設為 true
            imageListView1.AllowItemReorder = true;

            // 調整縮圖大小
            imageListView1.ThumbnailSize = new Size(100,100);

            // CheckBox 相關設定
            // CheckBox 顯示
            imageListView1.ShowCheckBoxes = false;
            // CheckBox 位置
            imageListView1.CheckBoxAlignment = ContentAlignment.TopLeft;

            // 事件
            imageListView1.ItemClick += ImageListView1_ItemClick;

            // 設定 ZoomingRenderer,預設為 DefaultRenderer
            imageListView1.SetRenderer(new ZoomingRenderer(0.5f));
        }

        private void Form1_Load(object sender, EventArgs e)
        {

        }

        private void btnLoadPhoto_Click(object sender, EventArgs e)
        {
            var fbd = new FolderBrowserDialog();
            if (fbd.ShowDialog() != DialogResult.OK)
                return;

            DirectoryInfo dir = new DirectoryInfo(fbd.SelectedPath);
            if (dir.Exists == false)
            {
                MessageBox.Show("該路徑異常,無法顯示圖片", "錯誤", MessageBoxButtons.OK, MessageBoxIcon.Error); ;
                return;
            }

            var photos = dir.GetFiles().Select(file => file.FullName).ToArray();

            imageListView1.SuspendLayout();
            imageListView1.Items.AddRange(photos);
            imageListView1.ResumeLayout();

            // 故意把使用者選擇資料夾路徑塞進 Tag 內,單純紀錄有 Tag Property 存在而已
            imageListView1.Tag = fbd.SelectedPath;
        }

        private void btnRemove_Click(object sender, EventArgs e)
        {
            if (imageListView1.SelectedItems.Any() == false)
            {
                MessageBox.Show("請選擇相片", "錯誤", MessageBoxButtons.OK, MessageBoxIcon.Error); ;
                return;
            }

            foreach (ImageListViewItem item in imageListView1.SelectedItems)
            {
                imageListView1.Items.Remove(item);
            }
        }

        private void btnClear_Click(object sender, EventArgs e)
        {
            imageListView1.Items.Clear();
        }

        private void ImageListView1_ItemClick(object sender, ItemClickEventArgs e)
        {
            string itemInfo = string.Empty;
            itemInfo += $"FileName:{e.Item.FileName}" + Environment.NewLine;
            itemInfo += $"FilePath:{e.Item.FilePath}" + Environment.NewLine;
            itemInfo += $"Text:{e.Item.Text}" + Environment.NewLine;
            txtImageIfo.Text = itemInfo;
        }
    }
}

View Model

相片排版呈現方式,預設為 View.Thumbnails 如下圖,相片大小可以透過 ThumbnailSize 來調整,其他 View 效果可以參考官方文件 - View Modes

Renderers

Renderers 為圖檔呈現效果,內部較常用的是 ZoomingRenderer,滑鼠滑過該圖片有放大效果,放大狀態下也會觸發 ItemClick 事件,該範例是把圖片相關資訊顯示在下方的 TextBox 內,官方文件 - Custom Renderers 內有其他 Render 效果可以參考,預設為 DefaultRenderer

星期三, 8月 03, 2022

[C#] CheckedListBox

根據官方文章 - CheckedListBox 的簡易筆記文
using System;
using System.Windows.Forms;

namespace CheckedListBoxSample
{
    public partial class Form1 : Form
    {
        public Form1()
        {
            InitializeComponent();

            Init();
        }

        private void Init()
        {
            btnAddFruit.Enabled = false;
            btnShow.Enabled = false;
            btnReset.Enabled = false;

            checkedListBox1.Items.Clear();
            listBox1.Items.Clear();

            // 預設新增資料
            string[] myFruit = { "Apples", "Oranges", "Tomato" };
            checkedListBox1.Items.AddRange(myFruit);
            checkedListBox1.Items.Add("Grape", true);

            // 預設為 false,先點選該項目後,才能勾選 CheckBox,開啟後就可以直接點選
            checkedListBox1.CheckOnClick = true;

            // 只支援 None 和 One,不支援 MultiSimple 和 MultiExtended
            //  使用 None 情況下就完全無法點選,One 為預設值
            checkedListBox1.SelectionMode = SelectionMode.One;
        }

        private void txtAddFruit_TextChanged(object sender, EventArgs e)
        {
            // 有輸入文字才能新增
            btnAddFruit.Enabled = string.IsNullOrWhiteSpace(txtAddFruit.Text) == false;
        }

        private void btnAddFruit_Click(object sender, EventArgs e)
        {
            if (string.IsNullOrWhiteSpace(txtAddFruit.Text))
                return;

            if (checkedListBox1.CheckedItems.Contains(txtAddFruit.Text))
                return;

            // 新增後清空
            checkedListBox1.Items.Add(txtAddFruit.Text, CheckState.Checked);
            txtAddFruit.Text = string.Empty;
        }

        private void btnShow_Click(object sender, EventArgs e)
        {
            listBox1.Items.Clear();
            btnReset.Enabled = false;

            for (int i = 0; i < checkedListBox1.CheckedItems.Count; i++)
            {
                listBox1.Items.Add(checkedListBox1.CheckedItems[i]);
            }

            if (listBox1.Items.Count > 0)
                btnReset.Enabled = true;
        }

        private void checkedListBox1_ItemCheck(object sender, ItemCheckEventArgs e)
        {
            if (e.NewValue == CheckState.Unchecked)
            {
                // 點擊當下的 CheckBox = Checked 控件數量,判斷是否為最後一個 Checked
                if (checkedListBox1.CheckedItems.Count == 1)
                {
                    btnShow.Enabled = false;
                }
            }
            else
            {
                btnShow.Enabled = true;
            }
        }

        private void btnReset_Click(object sender, EventArgs e)
        {
            Init();
        }
    }
}

[C#] CheckedListBox


星期五, 7月 29, 2022

[C#] Stack

對於 Stack 認知,只停留在後進先出 (LIFO) 觀念,剛好在社群討論上時有提到,根據官方文章 -  Stack<T> 來理解基礎使用並筆記
void Main()
{
	Stack<string> stack1 = new Stack<string>();

	if (stack1.TryPop(out string result) == false)
		"stack1 目前為空值,無法取值".Dump("Stack.TryPop() 使用");

	stack1.Push("one");
	stack1.Push("two");
	stack1.Push("three");
	stack1.Push("four");
	stack1.Push("five");

	stack1.Dump("顯示 stack 內元素,後進先出 (LIFO) 特色");

	stack1.Pop().Dump("Pop:第一次取值");
	stack1.Peek().Dump("Peek:下一次取值的資料");
	stack1.Pop().Dump("Pop:第二次取值");

	// 建構子接受參數為 IEnumerable<T>,透過它來建立 Stack2
	// stack1 經過上述兩次取值後,只剩下三筆資料 - three,two,one,
	// 因為後進先出 (LIFO) 特色,dump 出來後就又變成正向 one,two,three
	Stack<string> stack2 = new Stack<string>(stack1.ToArray());

	stack2.Dump("stack2 內容");
	@$"stack2.Contains(""four"") = {stack2.Contains("four")}".Dump("是否包含 four");

	// Create an array twice the size of the stack and copy the
	// elements of the stack, starting at the middle of the array.
	string[] array3 = new string[stack1.Count * 2];
	stack1.CopyTo(array3, stack1.Count);
	Stack<string> stack3 = new Stack<string>(array3);
	stack3.Dump("CopyTo():stack3 內容,包含 nulls");

	stack2.Clear();
	stack2.Count.Dump("使用 Clear() 清空 stakc2 並列出 stack2.Count 確認");
}
執行結果

[C#] Stack

星期三, 7月 27, 2022

[LINQ] Single、SingleOrDefault

以前對於 SingleOfDefault() 的認知是都不會拋出 Exception,直到踩到坑才發現,原來是空集合時會回傳預設值,萬一找出超過一個以上的資料,還是會拋出 Exception,重新認識 Single()、SingleOrDefault() 並筆記

SingleOrDefault 官方文件上說明

四種多載超過一個情況下都會拋出 Exception 的

[LINQ] Single、SingleOrDefault-1


簡易範例

用 LinqPad 來筆記語法
void Main()
{
	string[] fruits = { "apple", "banana", "mango", "orange", "passionfruit", "grape" };
	string[] emptyFruits = {};
	string defaultEmptyMessage = "no more fruits";
	
	"---------- Single 範例".Dump();
	
	fruits.Single(fruit => fruit == "apple").Dump("單一水果 apple 符合條件");
	
	try
	{	        
		emptyFruits.Single();
	}
	catch (InvalidOperationException ex)
	{
		ex.Message.Dump("空值拋出 InvalidOperationException");
	}
	
	emptyFruits.DefaultIfEmpty(defaultEmptyMessage).Single().Dump("使用 DefualtIfEmpty 避免 exception 發生");
	
	try
	{
		fruits.Single(fruit => fruit.Length > 15);
	}
	catch (InvalidOperationException ex)
	{
		ex.Message.Dump("沒有任何水果字母長度大於 15,拋出 InvalidOperationException");
	}

	"---------- SingleOrDefault 範例".Dump();

	fruits.SingleOrDefault(fruit => fruit == "orange").Dump("單一水果 orange 符合條件");

	emptyFruits.SingleOrDefault().Dump("空值,回傳預設值");
	
	emptyFruits.SingleOrDefault(defaultEmptyMessage).Dump("空值,回傳指定預設值");
	
	fruits.SingleOrDefault(fruit => fruit.Length > 10).Dump("長度大於 10 的水果");

	fruits.SingleOrDefault(fruit => fruit.Length > 15 , defaultEmptyMessage).Dump("沒有長度大於 15 的水果,回傳指定預設值");

	try
	{
		fruits.SingleOrDefault();
	}
	catch (InvalidOperationException ex)
	{
		ex.Message.Dump("超過一個水果符合條件,拋出 InvalidOperationException");
	}
}

Single 範例執行結果

[LINQ] Single、SingleOrDefault-2

SingleOrDefault 範例執行結果

[LINQ] Single、SingleOrDefault-3

星期四, 7月 21, 2022

[C#] DataGridView - Mouse Click

公司系統慣例是點選 DataGridView 非 DisplayedRow 區域新增空白資料,在 VFP GridView Mouse Click 相關事件,在 DisplayedRow 內是不會觸發,非 DisplayedRow 才會,而 C# WinForm 則是都會。

該差異導致移轉新系統後,使用者操作上不順暢,常常莫名就會新增資料至 DataGridView 內去,需要手動去刪除空白資料,就是會要求儲存時自動把空白資料刪除,特地去找出解法,讓 C# Mouse Click 事件只會在非 DisplayedRow 上觸發,減少這類無意義 feedback

DisplayedRow 名詞介紹

是從 C# DataGridView 看來,直接看圖較直白
  • 綠框為 DisplayRow
  • 藍框在官方文件上查不到專有名稱,就稱呼非 DisplayedRow 區域或空白區吧
[C#] DataGridView - Mouse Click-1


DataGridView 上顯示的資料筆數,透過 includePartialRow 參數來決定是否抓取顯示不完整的 Row,以下圖為例,false 是抓到兩筆,true 則為三筆

[C#] DataGridView - Mouse Click-2


抓取 DataGridView 上顯示第一筆 Row 的 RowInde,以下圖為例,會抓到編號 5 資料的 RowIndex

[C#] DataGridView - Mouse Click-3


自訂 DataGridView 

該筆記是在 MouseDown 事件並建立 InsertNewDataRow Event 來進行改寫,實務上就根據需求,看要在哪個 Mouse Click 事件內處理,也可以把整個 Mouse Click 事件都覆寫掉,那也就不需要特別去建立事件來觸發

該寫法個重點
  • 點擊在 ColumnHeader 時不觸發
  • 點擊在 RowHeader 時不觸發
  • 點擊在非 DisplayedRow 區域時觸發
  • ScrollBar 出現時,ScrollBar 必須在最下方時觸發
using System;
using System.ComponentModel;
using System.Windows.Forms;

namespace UCDataGridViewMouseDown
{
    public class UCDataGridView : DataGridView
    {
        [Description("點擊 DataGridView 非 DisplayedRow 區域時觸發")]
        public event EventHandler InsertNewDataRow;

        protected override void OnMouseDown(MouseEventArgs e)
        {
            base.OnMouseDown(e);

            int displayRowCount = DisplayedRowCount(false);
            int rowHeightIncludeHeaderHeight = ColumnHeadersHeight + (RowTemplate.Height * displayRowCount);
            
            bool isClickInRowHeader = RowHeadersWidth > e.X;            
            bool isClickInColumnHeader = ColumnHeadersHeight >= e.Y;
            bool isClickInNonDisplayedRow = rowHeightIncludeHeaderHeight < e.Y;

            if (isClickInRowHeader ||
                isClickInColumnHeader)
                return;

            VScrollBar vScrollBar = Controls.OfType<VScrollBar>().First();

            int rowIndexMax = RowCount - 1;
            // DataGridView 畫面上第一筆資料的 RowIndex 加上 畫面上資料筆數
            int indexStat = FirstDisplayedScrollingRowIndex + displayRowCount;
            bool isScrolBottom = indexStat > rowIndexMax;

            if (isClickInNonDisplayedRow && (
                    RowCount == 0 ||
                    vScrollBar.Visible == false ||
                    (vScrollBar.Visible == true && isScrolBottom)))
                    InsertNewDataRow?.Invoke(this, e);
        }
    }
}
把自訂控件拉進 Form 內使用
using System;
using System.Data;
using System.Windows.Forms;

namespace UCDataGridViewMouseDown
{
    public partial class Form1 : Form
    {
        public Form1()
        {
            InitializeComponent();

            dataGridView1.AllowUserToAddRows = false;
            dataGridView1.AutoGenerateColumns = false;
            dataGridView1.InsertNewDataRow += DataGridView1_InsertNewDataRow;

            DataTable dt = new DataTable();
            dt.Columns.Add("ID", typeof(int));
            dt.Columns.Add("Name", typeof(string));
            dt.Rows.Add(1, "姓名一");
            dt.Rows.Add(2, "姓名二");
            dt.Rows.Add(3, "姓名三");
            dt.Rows.Add(4, "姓名四");
            dt.Rows.Add(5, "姓名五");
            dt.Rows.Add(6, "姓名六");
            dataGridView1.DataSource = dt;
        }

        private void DataGridView1_InsertNewDataRow(object sender, EventArgs e)
        {
            MessageBox.Show(nameof(UCDataGridView.InsertNewDataRow));
        }
    }
}
  • 參考資料
  • 網路討論 12

星期一, 7月 11, 2022

[C#] DataGridView - CalendarColumn

根據官方文章 - How to: Host Controls in Windows Forms DataGridView Cells 來學習如何把 DateTimePicker 放進 DataGridViewColumn 內,基本上把文章內的 Code 直接 copy 出來就可以直接建立出 CalendarColumn 並使用,該內容重點分別為
  • 實作 IDataGridViewEditingControl  interface
  • DataGridViewCell
  • DataGridViewColumn

IDataGridViewEditingControl

建立 CalendarEditingControl 繼承 DateTimePicker 並實作IDataGridViewEditingControl

IDataGridViewEditingControl.EditingControlWantsInput 重點文字
The EditingControlWantsInputKey method is called by the DataGridView. The DataGridView will pass in true for dataGridViewWantsInputKey when it can process the keyData. If the editing control can let the DataGridView handle the keyData, EditingControlWantsInputKey should return false when dataGridViewWantsInputKey is true. Other implementations of EditingControlWantsInputKey may ignore a dataGridViewWantsInputKey value of true and handle the keyData in the editing control.
Some situations require that cell contents reposition when the value changes. For example, cell contents may need to reposition when a cell wraps text and the contents become larger.

星期日, 7月 03, 2022

[C#] ParentControlDesigner

一直以為 UserControl 就必須事先把控件設計好,整個 UserControl 拉進來使用就是,在閱讀官方文件 - Use Visual C# to make a UserControl object act as a control container design-time 後,發現原來在設計階段 (design mode) 下可以讓 UserControl 變成父容器,能把控件拖曳進去變成子控件

ParentControlDesigner 是從 ControlDesigner 繼承而來,所以除了讓 UserControl 在設計階段變成容器外,也同樣可以設計智能標籤來使用喔

設計智能標籤內容

只設計一個背景顏色屬性來使用
using System;
using System.ComponentModel;
using System.ComponentModel.Design;
using System.Drawing;

namespace UCParentControlDesigner
{
    public class UCContainerActionList : DesignerActionList
    {
        private UCContainer _ucContainer;

        public UCContainerActionList(IComponent component) : base(component)
        {
            _ucContainer = component as UCContainer;
        }

        private PropertyDescriptor GetPropertyByName(string propName)
        {
            PropertyDescriptor prop = TypeDescriptor.GetProperties(_ucContainer)[propName];
            if (null == prop)
                throw new ArgumentException($"UCContainer 屬性:{propName} 沒有找到");
            else
                return prop;
        }

        public Color BackColor
        {
            get
            {
                return _ucContainer.BackColor;
            }
            set
            {
                GetPropertyByName(nameof(BackColor)).SetValue(_ucContainer, value);
            }
        }

        public override DesignerActionItemCollection GetSortedActionItems()
        {
            DesignerActionItemCollection items = new DesignerActionItemCollection();

            items.Add(new DesignerActionPropertyItem(
                 nameof(BackColor),
                 "背景顏色",
                 "外觀",
                 "選擇背景顏色"));

            return items;
        }
    }
}

使用 ParentControlDesigner

UCContainerControlDesigner 繼承 ParentControlDesigner,使 UserControl 變成父容器並把上述設計好的智能標籤放進來
using System.ComponentModel.Design;
using System.Windows.Forms.Design;

namespace UCParentControlDesigner
{
    public class UCContainerControlDesigner : ParentControlDesigner
    {
        private DesignerActionListCollection actionLists;

        public override DesignerActionListCollection ActionLists
        {
            get
            {
                if (null == actionLists)
                {
                    actionLists = new DesignerActionListCollection();
                    actionLists.Add(new UCContainerActionList(this.Component));
                }
                return actionLists;
            }
        }
    }
}

設計階段具容器功能的 UserControl

建立 UCContainer UserControl 並使用 UCContainerControlDesigner
using System.ComponentModel;
using System.Drawing;
using System.Windows.Forms;

namespace UCParentControlDesigner
{

    [Designer(typeof(UCContainerControlDesigner))]
    public partial class UCContainer : UserControl
    {
        public UCContainer()
        {
            InitializeComponent();

            // 預設背景顏色為淡灰色
            BackColor = Color.LightGray;
        }
    }
}

設計效果顯示

該 gif 示範把 Button 控件拖曳進 UCContainer 內,並成為 UCContainer 的子控件
背景顏色的智能標籤