星期五, 12月 30, 2016

[DP] 裝飾者模式

寫個簡易範例來幫助了解裝飾者模式
Drink Class 相關
namespace Beverage
{
    public abstract class Drink
    {
        protected string DrinkName = string.Empty;
        protected decimal DrinkPrice = 0.0m;

        public virtual string GetDrinkName()
        {
            return DrinkName;
        }
        
        public abstract string GetDescript();
        public abstract decimal GetPrice();
    }

    public class GreeTea : Drink
    {
        public GreeTea()
        {
            this.DrinkName = "綠茶";
            this.DrinkPrice = 15m;
        }

        public override string GetDrinkName()
        {
            return DrinkName;
        }

        public override string GetDescript()
        {
            return $"{DrinkName} ( {DrinkPrice} )";
        }

        public override decimal GetPrice()
        {
            return DrinkPrice;
        }
    }
}
Decorator Class 相關
namespace Beverage
{
    public abstract class Decorator : Drink
    {
        protected Drink drink;
        protected string DecoratorName = string.Empty;
        protected decimal DecoratorPrice = 0.0m;

        public Decorator(Drink drink)
        {
            this.drink = drink;
        }

        public override string GetDrinkName()
        {
            return drink.GetDrinkName();
        }

        public override string GetDescript()
        {
            return drink.GetDescript() + $", {DecoratorName} ( {DecoratorPrice} )";
        }

        public override decimal GetPrice()
        {
            return drink.GetPrice() + DecoratorPrice;
        }
    }

    public class Bubble : Decorator
    {
        public Bubble(Drink drink) : base(drink)
        {
            this.DecoratorName = "珍珠";
            this.DecoratorPrice = 10m;
        }
    }

    public class Milk : Decorator
    {
        public Milk(Drink drink) : base(drink)
        {
            this.DecoratorName = "牛奶";
            this.DecoratorPrice = 21m;
        }
    }

    public class Yakult : Decorator
    {
        public Yakult(Drink drink) : base(drink)
        {
            this.DecoratorName = "養樂多";
            this.DecoratorPrice = 10m;
        }

        public override string GetDrinkName()
        {
            return $"{DecoratorName} - {drink.GetDrinkName()}";
        }
    }
}
執行
namespace Beverage
{
    class Program
    {
        static void Main(string[] args)
        {
            Drink d1 = new GreeTea();
            d1 = new Bubble(d1);
            d1 = new Yakult(d1);
            ShowData(d1);
        }

        private static void ShowData(Drink d)
        {
            Console.WriteLine($"品名:{d.GetDrinkName()}");
            Console.WriteLine($"價格:{d.GetPrice()}");
            Console.WriteLine($"說明:{d.GetDescript()}");
        }

    }
}
結果

星期五, 12月 23, 2016

[C#] 利用 DES 加解密

利用 DES 來加解密 txt 檔案,藉此了解檔案加解密是如何進行的

using System.IO;
using System.Security.Cryptography;

namespace DESPractice
{
    public partial class Form1 : Form
    {
        public Form1()
        {
            InitializeComponent();
        }

        private string Dir = @"D:\CryptographyTemp";
        private string Content = string.Empty;
        private string DefaultTxtName = "Source.txt";

        private void Form1_Load(object sender, EventArgs e)
        {
            // 預設檔案路徑
            txtSourceFile.Text = Path.Combine(Dir, DefaultTxtName);
            txtEncryptSourceFile.Text = Path.Combine(Dir, "加密", DefaultTxtName);
            txtDecryptFile.Text = Path.Combine(new string[] { Dir, "解密", DefaultTxtName });

            // DESCrypto 所需的 Key 和 IV
            txtKey.Text = "12345678";
            txtIV.Text = "12345678";

            // 選擇來源檔案時,會一併建立 txt 測試檔案,此為 txt 檔案內容
            Content += "參考資料                                " + Environment.NewLine;
            Content += "* Encoding 類別                       " + Environment.NewLine;
            Content += "* ASCIIEncoding 類別                  " + Environment.NewLine;
            Content += "* Convert.ToBase64String 方法 (Byte[])" + Environment.NewLine;
            Content += "* StreamReader.ReadToEnd 方法()       " + Environment.NewLine;
            Content += "* Stream.CopyTo 方法                  " + Environment.NewLine;
            Content += "* 如何使用 Visual C# 加密和解密檔案     " + Environment.NewLine;

            btnSourceFile.Click += BtnClick;
            btnEncryptSourceFile.Click += BtnClick;
            btnDecryptFile.Click += BtnClick;
        }

        private void BtnClick(object sender, EventArgs e)
        {
            SaveFileDialog fd = new SaveFileDialog();
            fd.Filter = "(*.txt) | *.txt | All files(*.*) | *.*";
            fd.InitialDirectory = @"D:\CryptographyTemp";
            if (fd.ShowDialog() != DialogResult.OK) return;

            Button btn = sender as Button;
            string btnName = btn.Name;
            switch (btnName)
            {
                case "btnSourceFile":
                    txtSourceFile.Text = fd.FileName;
                    // 利用 File.WriteAllText() 把資料寫進去 txt 檔案
                    File.WriteAllText(fd.FileName, Content, Encoding.Default);
                    break;
                case "btnEncryptSourceFile":
                    txtEncryptSourceFile.Text = fd.FileName;
                    break;
                case "btnDecryptFile":
                    txtDecryptFile.Text = fd.FileName;
                    break;
                default:
                    break;
            }
        }

        private Tuple<byte[], byte[]> KeyIV(string key, string iv)
        {
            return new Tuple<byte[], byte[]>
                (
                    Encoding.ASCII.GetBytes(key),
                    Encoding.ASCII.GetBytes(iv)
                );
        }

        private void btnRunEncrypt_Click(object sender, EventArgs e)
        {
            DESCryptoServiceProvider des =
                new DESCryptoServiceProvider();

            Tuple<byte[], byte[]> result = KeyIV(txtKey.Text.Trim(), txtIV.Text.Trim());
            byte[] key = result.Item1;
            byte[] iv = result.Item2;

            // 來源檔案
            using (FileStream fsSource = new FileStream(
                  txtSourceFile.Text.Trim(),
                  FileMode.Open,
                  FileAccess.Read))
            // 加密檔案
            using (FileStream fsEncrypt = new FileStream(
                txtEncryptSourceFile.Text.Trim(),
                FileMode.Create,
                FileAccess.Write))
            // 進行加密
            using (CryptoStream cs = new CryptoStream(
               fsEncrypt,
               des.CreateEncryptor(key, iv),
               CryptoStreamMode.Write))
            {
                // CopyTo 是從 Stream 現在 Position 讀取到尾,避免 Position 不是在頭,要先設 Position = 0
                fsSource.Position = 0;
                fsSource.CopyTo(cs);
            }

            ReadTextFile();
        }

        private void btnRunDecrypt_Click(object sender, EventArgs e)
        {
            DESCryptoServiceProvider des =
                new DESCryptoServiceProvider();

            Tuple<byte[], byte[]> result = KeyIV(txtKey.Text.Trim(), txtIV.Text.Trim());
            byte[] key = result.Item1;
            byte[] iv = result.Item2;

            // 已加密檔案
            using (FileStream fsDecrypt = new FileStream(
                txtEncryptSourceFile.Text.Trim(),
                FileMode.Open,
                FileAccess.Read))
            // 進行解密
            using (CryptoStream cs = new CryptoStream(
                 fsDecrypt,
                 des.CreateDecryptor(key, iv),
                 CryptoStreamMode.Read))
            // 把解密後資料讀出來
            using (StreamReader sr = new StreamReader(cs, Encoding.Default))
            // 把解密後資料送進 txt 檔案內
            using (StreamWriter sw = new StreamWriter(txtDecryptFile.Text.Trim(), false, Encoding.Default))
            {
                string Content = sr.ReadToEnd();
                // 利用 StreamWriter() 把資料寫進檔案內,要把 Stream 關閉,資料才會寫進檔案內喔
                sw.Write(Content);
            }

            ReadTextFile();
        }

        private void ReadTextFile()
        {
            // 把資料送進 txtSource、txtEncrypt、txtDecrypt
            string Source = txtSourceFile.Text.Trim();
            if (File.Exists(Source))
            {
                using (StreamReader srSource = new StreamReader(Source, Encoding.Default))
                {
                    txtSource.Text = srSource.ReadToEnd();
                }
            }

            string Encrypt = txtEncryptSourceFile.Text.Trim();
            if (File.Exists(Encrypt))
            {
                using (StreamReader srEncrypt = new StreamReader(Encrypt, Encoding.Default))
                {
                    txtEncrypt.Text = srEncrypt.ReadToEnd();
                }
            }

            string Decrypt = txtDecryptFile.Text.Trim();
            if (File.Exists(Decrypt))
            {
                using (StreamReader srDecrypt = new StreamReader(Decrypt, Encoding.Default))
                {
                    string Content = srDecrypt.ReadToEnd();
                    txtDecrypt.Text = Content;
                }
            }
        }
    }
}
[C#] 加解密

星期一, 12月 12, 2016

[C#] 利用 GZipStram 進行壓縮與解壓縮

根據 如何:壓縮與解壓縮檔案 這篇文章來學習 GZipStream 壓縮、解壓縮檔案

WinFomr Layout

[C#] 壓縮與解壓縮-1

星期五, 12月 02, 2016

Lenovo Ideapad 310 進入 BIOS

公司新買筆電,發現開機時按 F2、F12 鍵,都沒有辦法進入 BIOS、設定啟動裝置,查使用手冊才知道,要進入 BIOS 要在關機狀態下,按 Novo 鍵,該按鍵就是下圖紅框框的 8 號裝置,要用迴紋針才按的到喔

Lenovo Ideapad 310 進入 BIOS

星期四, 12月 01, 2016

[Win10] Windows 相片檢視器

之前公司電腦都是升級到 Win10,把圖片預設程式改為 Windows 相片檢視器很輕易就可以做到,最近買了一台 PC 內載 Win10,才發現到,為什麼沒有辦法改,找不到 Windows 相片檢視器選項,Orz
Google 後發現,原來 Win10 Windows 相片檢視器,regedit 路徑為 HKEY_LOCAL_MACHINE\SOFTWARE\Microsoft\Windows Photo Viewer\Capabilities\FileAssociations 內預設副檔名只有 .tif 和 .tiff

升級為 Win10 系統 regedit 內副檔名
原生 Win10 系統 regedit 內副檔名
所以只要把要用 Windows 相片檢視器顯示的相關副檔名都加進去就好啦,弄成 reg 檔案 - Win10_WindowsPhotoViewer 方便新增
Windows Registry Editor Version 5.00
[HKEY_LOCAL_MACHINE\SOFTWARE\Microsoft\Windows Photo Viewer\Capabilities\FileAssociations]
".tif"="PhotoViewer.FileAssoc.Tiff"
".tiff"="PhotoViewer.FileAssoc.Tiff"
".png"="PhotoViewer.FileAssoc.Tiff"
".jpg"="PhotoViewer.FileAssoc.Tiff"
".jpeg"="PhotoViewer.FileAssoc.Tiff"
".gif"="PhotoViewer.FileAssoc.Tiff"
".bmp"="PhotoViewer.FileAssoc.Tiff"
".ico"="PhotoViewer.FileAssoc.Tiff"
執行 Win10_WindowsPhotoViewer.reg 會出現下面提示訊息
執行完成後
完成後 regedit 內的副檔名清單
再去修改預設程式就可以看見 Windows 相片檢視器啦
相片程式在實務上遇到的缺點

  • 透過內部 ERP 去開啟,不知道為什麼,直向圖片,常常會變成橫向圖片
  • 人員常常會需要開開關關圖片,OS 很容易在那邊轉圈圈,轉圈圈當下,左下角的 Windows 功能左鍵功能就掛掉,按不出來,通常都是重開機讓 OS 恢復正常,要不就是耐心等待下面的錯誤訊息跳出來,不過真的要挺有耐心的,Orz
[Win10] Windows 10 相片檢視器-4

20240606 更新

該筆記作法在 Win11 23H2 (OS 組建 22631.3672) 上也是可以使用的

星期一, 11月 28, 2016

[C#] Windows Service

根據這篇 MSDN 文章 逐步解說:在元件設計工具中建立 Windows 服務應用程式 的筆記,該文章是利用 Windows Service 的啟動、停止和 Timer 來對事件檢視器新增資料,藉此觀察 Windows Service 狀態

在 VS 2015 上建立 Windows Service 範本,路徑是 [Visucal C# => 傳統桌面 => Windows 服務],一開始要找到該範本就卡關,利用 "Windows Service" 去搜尋,完全找不到,以為要在 VS 上另外安裝,Google 後才恍然大悟,中文版應該用 "Windows 服務" 去找才對啦,Orz

[C#] Windows Service-6

星期三, 11月 16, 2016

[C#] Control.Visible 和 DataBinding

實務上有把控件隱藏起來的設計,使用時發現資料無法回傳 DB,才發現原來原來控件隱藏的時間點很重要
  • 控件加入 Form 隱藏,DataBinding 無法正常作動
  • 控件加入 Form 隱藏,預期效果
測試只發現上述說明,後來才找到這篇 技術論壇討論,說明該情況是因為 Binding.Fomat Event 加入前隱藏的話,Format Event 就不會被觸發。

簡易範例來記錄

Form Layout

[C#] Control.Visible 和 DataBinding-1

星期六, 11月 12, 2016

[C#] ComboBox DropDownList (續)

在這篇 [C#] ComboBox DropDownList 提到 Item 和 DataBinding 資料,字元長度要一樣,DropDownList 才會正確顯示資料,實務上是把 Item 資料放在 DB Table (以下稱呼 ComboBoxData Table) 內,因為會有各式各樣的 ComboBox Item 資料放在這,所以 ComboBoxData Table 資料欄位長度一定和 Data Table 欄位長度不一樣,因此兩者必須互相搭配才成正確顯示 DropDownList 資料

簡易範例:利用自訂 ComboBox 控件來正確顯示 DropDownList 資料

方案內容

[C#] ComboBox DropDownList (續)-1

WinForm Layout

[C#] ComboBox DropDownList (續)-2

星期四, 11月 10, 2016

[C#] 避免 Hard Code

論壇上偶而會看見的寫法
comboBox1.GetType().ToString() == "System.Windows.Forms.ComboBox"
該寫法程式會正確判斷也不會有任何異常,但根本是挑戰自我專注力,只要打錯任何一個字,就變成 false,會建議改成下列寫法
namespace WindowsFormsApplication1
{
    public partial class Form1 : Form
    {
        private void Form1_Load(object sender, EventArgs e)
        {
            StringBuilder sb = new StringBuilder();

            // 利用 Type 判斷
            if (comboBox1.GetType() == typeof(ComboBox))
                sb.AppendLine("Type 判斷:Yes");
            else
                sb.AppendLine("Type 判斷:NO");

            // 利用 ToString() 字串判斷
            if (comboBox1.GetType().ToString() == "System.Windows.Forms.ComboBox")
                sb.AppendLine("ToString() 字串判斷:Yes");
            else
                sb.AppendLine("ToString() 字串判斷:NO");

            // 利用 ToString() 字串判斷,故意大小寫錯一個
            if (comboBox1.GetType().ToString() == "System.Windows.Forms.Combobox")
                sb.AppendLine("ToString() 字串判斷,故意大小寫錯一個字:Yes");
            else
                sb.AppendLine("ToString() 字串判斷,故意大小寫錯一個字:NO");

            MessageBox.Show(sb.ToString(), "控件判斷", MessageBoxButtons.OK, MessageBoxIcon.Information);
        }
    }
}
[C#] 避免 Hard Code

星期三, 11月 09, 2016

[C#] DataGridView 內顯示民國年

在 DataGridView 內透過 Taiwan Calendar 來把西元年轉換為民國年
namespace dgvDate
{
    public partial class Form1 : Form
    {
        public Form1()
        {
            InitializeComponent();
        }

        private void Form1_Load(object sender, EventArgs e)
        {
            dataGridView1.AutoGenerateColumns = false;

            // 建立 Column
            dataGridView1.Columns.Add(new DataGridViewTextBoxColumn
            {
                DataPropertyName = "Data",
                Name = "ColAD",
                HeaderText = "西元年",
                Width = 100
            });

            dataGridView1.Columns.Add(new DataGridViewTextBoxColumn
            {
                DataPropertyName = "Data",
                Name = "ColSimple",
                HeaderText = "民國年 - 簡單",
                Width = 100
            });

            dataGridView1.Columns.Add(new DataGridViewTextBoxColumn
            {
                DataPropertyName = "Data",
                Name = "ColFull",
                HeaderText = "民國年 - 完整",
                Width = 100
            });

            dataGridView1.Columns.Add(new DataGridViewTextBoxColumn
            {
                DataPropertyName = "Data",
                Name = "ColCustom",
                HeaderText = "民國年 - 自訂",
                Width = 100
            });

            // 資料來源
            DataTable dt = new DataTable();
            dt.Columns.Add("ID", typeof(int));
            dt.Columns.Add("Data", typeof(DateTime));
            dt.Rows.Add(1, DateTime.Today);
            dataGridView1.DataSource = dt;

            // 民國年設定
            CultureInfo ci = new CultureInfo("zh-TW", true);
            ci.DateTimeFormat.Calendar = new TaiwanCalendar();

            dataGridView1.Columns["ColSimple"].DefaultCellStyle.FormatProvider = ci;
            dataGridView1.Columns["ColSimple"].DefaultCellStyle.Format = "d";

            dataGridView1.Columns["ColFull"].DefaultCellStyle.FormatProvider = ci;
            dataGridView1.Columns["ColFull"].DefaultCellStyle.Format = "D";

            dataGridView1.Columns["ColCustom"].DefaultCellStyle.FormatProvider = ci;
            dataGridView1.Columns["ColCustom"].DefaultCellStyle.Format = "yyy-MM-dd";
        }
    }
}
[C#] DataGridView 內顯示民國年

星期二, 11月 08, 2016

[C#] Constructor 建構子 - this

看見朋友 Blog 筆記、且也在論壇上看見 Constructor 建構子搭配 this 使用,腦海中就只有呼叫父 class 建構子 base 用法,趁這個機會了解筆記

簡易範例
namespace ConsoleApplication1
{
    class Program
    {
        static void Main(string[] args)
        {
            demo d = new demo();

            Console.WriteLine("--------------------------");

            demo d1 = new demo("this 測試,呼叫預設建構子");

            Console.WriteLine("--------------------------");

            demo d2 = new demo("this 測試" , "呼叫指定建構子");
        }
    }

    public class demo
    {
        public demo()
        {
            Console.WriteLine("預設建構子");
        }

        public demo(string data) : this()
        {
            Console.WriteLine($"建構子1:{data}");
        }

        public demo(string data1 , string data2) : this(data2)
        {
            Console.WriteLine($"建構子2:{data1}-{data2}");
        }

    }
}
[C#] Constructor 建構子 - this

星期一, 11月 07, 2016

[C#] ComboBox DropDownList

使用 ComboBox.DropDownList 時,發現會無法正確地顯示資料,還不是每一個 ComboBox 都會發生,後來釐清才發現,原來設定 DropDownList 時,Item 和 DataBinding 的資料,字元長度要一樣才行

簡易範例 - cboShow 用來顯示使用者 cboSelected 和 chkEmpty 組合資料,完全一模一樣就會顯示在 cboShow 上
namespace DropDownList
{
    public partial class Form1 : Form
    {
        public Form1()
        {
            InitializeComponent();
        }

        private void Form1_Load(object sender, EventArgs e)
        {
            // B 和 D 故意空一格
            cboShow.Items.Add("A");
            cboShow.Items.Add("B ");
            cboShow.Items.Add("C");
            cboShow.Items.Add("D ");
            cboShow.Items.Add("E");

            cboSelected.Items.Add("A");
            cboSelected.Items.Add("B");
            cboSelected.Items.Add("C");
            cboSelected.Items.Add("D");
            cboSelected.Items.Add("E");
        }

        private void button1_Click(object sender, EventArgs e)
        {
            // 一律先空白
            cboShow.SelectedIndex = -1;
            // 組合使用者選擇資料
            string result = cboSelected.Text.Trim();
            if (checkEmpty.Checked == true) result += " ";
            // 設定顯示
            cboShow.Text = result;
        }
    }
}

[C#] ComboBox DropDownList

星期日, 11月 06, 2016

[C#] ComboBox 預設值

要指定 ComboBox Item 中的選項(Item),要透過指定 ComboBox.SelectedIndex 來做到

簡易範例
namespace ComboBoxDefaultValue
{
    public partial class Form1 : Form
    {
        public Form1()
        {
            InitializeComponent();
        }

        private void Form1_Load(object sender, EventArgs e)
        {
            comboBox1.Items.Add("A");
            comboBox1.Items.Add("B");
            comboBox1.Items.Add("O");
            comboBox1.Items.Add("AB");

            // ComboBox 預設顯示值為 O
            comboBox1.SelectedIndex = 2;
        }

        private void btnAssign_Click(object sender, EventArgs e)
        {
            // 指定顯示 AB
            comboBox1.SelectedIndex = comboBox1.FindStringExact("AB");
        }

        private void btnEmpty_Click(object sender, EventArgs e)
        {
            // ComboBox 不顯示任何資料
            comboBox1.SelectedIndex = -1;
        }

        private void btnExt_Click(object sender, EventArgs e)
        {
            // 指定顯示 Item,不存在就顯示第一個 Item
            comboBox1.SelectedIndex = comboBox1.FindStringExactDefault("AA");
        }
    }

    /// <summary>
    /// ComboBox 擴充方法
    /// </summary>
    public static class ExtComboBox
    {
        /// <summary>
        /// 利用 FindStringExtra() 搜尋,沒有該 Item 的話,就回傳 Index = 0,而非 -1
        /// </summary>
        /// <param name="cbo">ComboBox 控件</param>
        /// <param name="target">目標搜尋字串</param>
        /// <returns>該 Item 索引</returns>
        public static int FindStringExactDefault(this ComboBox cbo, string target)
        {
            int index = cbo.FindStringExact(target);
            return index == -1 ? 0 : index;
        }
    }
}

星期五, 11月 04, 2016

[Azure] Microsoft Azure Storage Explorer

Microsoft Azure Storage Explorer (ASE)是官方 Storage 管理工具,目前版本是 0.8.5,下載來使用

建立 Storage Account 要透過 ASE 來操作看看

[Azure] Microsoft Azure Storage Explorer-1


沒想到在 ASE 上要連結 Storage,竟然失敗了

[Azure] Microsoft Azure Storage Explorer-2

發現在建立 ASE 建立連線時,以為只要有存取金鑰就可以存取,把 Account Name 想成是別名,可以隨便取,把 Account Name 修正就可以正常連線

[Azure] Microsoft Azure Storage Explorer-3

一整個烏龍,Orz

星期四, 11月 03, 2016

Win10 上執行 16bit 應用程式

公司製程保全先生跑來詢問,一如往常的一貫語氣,程式在 Win7 32bit 上跑都沒有問題,換成 Win10 64bit 後就不能跑了啦,^^''

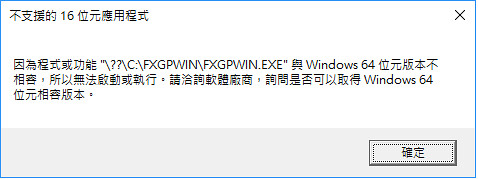
原想說,那就相容性模式設一設就好啦,也教過好幾次啦,沒想到這次真的連相容性模式都 GG 了,完全無法執行,畫面如下

Win10 上執行 16bit 應用程式-1

上述錯誤訊息實在是太籠統,在 cmd 內用系統管理者權限去執行,總算是有點線索,不過也囧了,X 的,竟然是 16bit 應用程式

Win10 上執行 16bit 應用程式-2

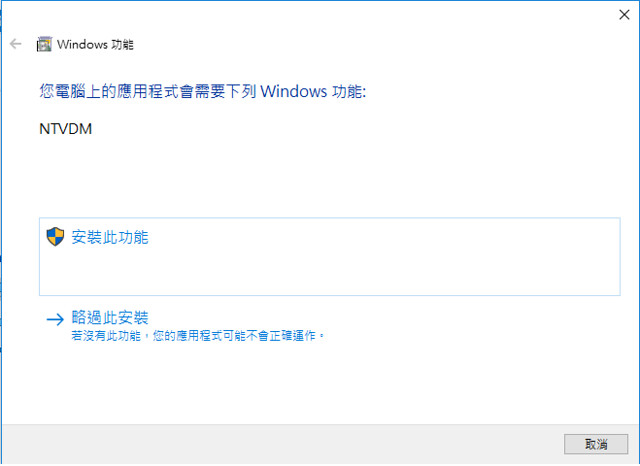
Google 些資料後發現,原來 Win10 64bit 沒有辦法執行 16bit 應用程式,但是 Win10 32bit 配合 NTVDM 是可以的,馬上利用 Hyper-V 弄個 Win10 32bit 來測試,當執行該程式時,會跳下面訊息,詢問是否要開啟 NTVDM

Win10 上執行 16bit 應用程式-3

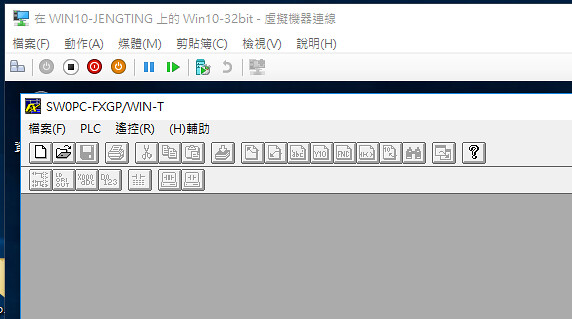
安裝完成後就可以開啟該 16bit 應用程式

Win10 上執行 16bit 應用程式-4

目前解決方向
  • 利用 Hyper-V 來安裝 32bit 環境使用
  • 該工程人員還有配一台 XP NB,方便拿到現場機台旁進行操作,16bit 應用程式以後就在該 NB 上執行就好
  • 重灌成 Win10 32bit
想也知道一定是我當苦力,重灌成 Win10 32bit,誰叫你要改成 Win10 64bit 害我不能用,結案,QQ

星期五, 10月 28, 2016

[VS] 視窗配置

從某大師介紹 Visual Studio PowerPoint 看見的功能 - 視窗配置

[VS] 視窗配置-1

建立兩個視窗配置,分別為 WinForm 和 Coding

WinForm 視窗配置

[VS] 視窗配置-2

Coding 視窗配置 (利用 VS 快捷鍵 Alt + Shift + Enter 是 Coding 視窗全螢幕)

[VS] 視窗配置-3

建立完成後,可以視窗配置管理內移動配置順序

[VS] 視窗配置-5

切換視窗配置,也可以利用快捷鍵 Ctrl + Alt + 數字 來切換

[VS] 視窗配置-6

切換視窗的提示訊息

[VS] 視窗配置-4

星期四, 10月 27, 2016

[SQL] 基礎 T-SQL 練習

論壇問題

[SQL] 基礎 TSQL 練習

練習 T-SQL

-- 資料建立
DECLARE @t_user TABLE (
    f_id int
    , f_name char(10)
    , f_birthday date
    , f_phone char(11)
    , f_level tinyint ) 

INSERT INTO @t_user (f_id , f_name , f_birthday , f_phone , f_level) VALUES
    (1 , 'Peter' , '1990-01-01' , '0911-123456' , 2)
    , (2 , 'Amy' , '1990-11-26' , '0911-235685' , 5)
    , (3 , 'Robert' , '1992-03-06' , '0912-365754' , 4)
    , (4 , 'Anna' , '1990-05-05' , '0913-644112' , 4)
    , (5 , 'Tina' , '1986-11-30' , '0922-111111' , 3)

DECLARE @t_bonus TABLE (
    f_name char(10)
    , f_bonus money
    , f_date date )

INSERT INTO @t_bonus (f_name , f_bonus , f_date) VALUES
    ('Peter' , 5000 , '2016-09-10')
    , ('Robert' , 1650 , '2016-09-10')
    , ('Anna',2500,'2016-08-10')
    , ('Peter',1000,'2016-07-10')
    , ('Anna',1500,'2016-10-10')

-- 1-1 查詢 1990 年出生的會員所有資料,按照生日排序 (由大至小)
SELECT * 
FROM @t_user 
WHERE f_birthday BETWEEN '1990-01-01' AND '1990-12-31'
ORDER BY f_birthday

-- 1-2 查詢名稱包含 er 字串的會員所有資料,按照 f_level 排序 (由小到大)
SELECT * 
FROM @t_user
WHERE CHARINDEX('er' , f_name) <> 0
ORDER BY f_level

-- 1-3 查詢 t_user 中有獎金 (記錄在 t_bonus) 的會員所有資料 (使用 IN)
SELECT *
FROM @t_user
WHERE f_name IN (SELECT f_name FROM @t_bonus)

-- 1-4 查詢 2016 年下半年是否有員工領到獎金 (使用 EXISTS)
SELECT T1.*
FROM @t_user AS T1
WHERE EXISTS
    (
        SELECT 1
        FROM @t_bonus AS T2
        WHERE T2.f_date BETWEEN '2016-07-01' AND '2016-12-31'
            AND T1.f_name = T2.f_name
    )

-- 1-5 查出表 A 有領過獎金的員工所有資料 (使用 DISTINC)
SELECT T1.*
FROM @t_user AS T1
    JOIN 
      (
          SELECT DISTINCT f_name
          FROM @t_bonus
      ) AS T2 ON T1.f_name = T2.f_name
  
-- 2.1 查出 2016 年 9 月領最大獎金的員工名稱
SELECT 
    TOP 1 
    f_name ,
    MAX(f_bonus) AS MaxBonus
FROM @t_bonus 
WHERE f_date >='2016/09/01' and f_date < '2016/10/01'
GROUP BY f_name 
ORDER BY MaxBonus DESC

-- 2.2 查出 2016 年每個員工的總共領取的獎金金額
SELECT
    f_name
    , SUM(f_bonus) AS TotalBonus
FROM @t_bonus
WHERE f_date BETWEEN '2016-01-01' AND '2016-12-31'
GROUP BY f_name

-- 2.3 查出 2016 年總共領取獎金超過 2000 的員工名稱、總獎金金額 (使用 GROUP BY & HAVING)
SELECT
    f_name
    , SUM(f_bonus) AS TotalBonus
FROM @t_bonus 
WHERE f_date BETWEEN '2016-01-01' AND '2016-12-31'
GROUP BY f_name
HAVING SUM(f_bonus) > 2000

星期四, 10月 20, 2016

[WinXP] 開啟重覆執行 chddsk 指令

發現某台 XP 工業 PC 竟然每次開機都會跑 chkdsk 檢查 D 磁碟區

[WinXP] 開啟重覆執行 chddsk 指令-1

原本想說部會是 Disk 快掛掉了,MHDD 檢查是 OK,後來查到這 篇論壇討論,下指令
chkntfs /x d:
就可以修復該問題

[WinXP] 開啟重覆執行 chddsk 指令-2

星期五, 10月 14, 2016

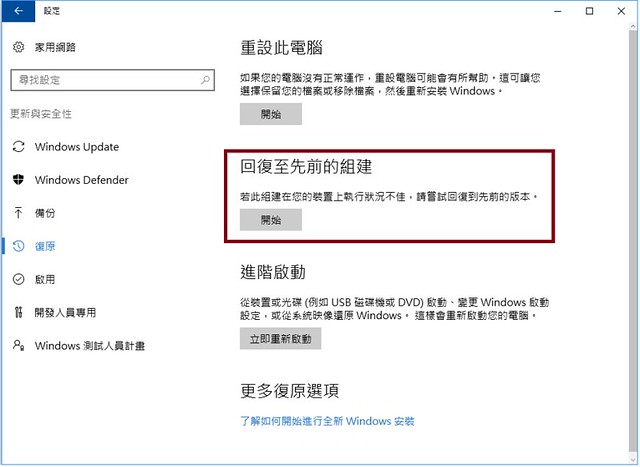
[Win10] 回復至先前組件

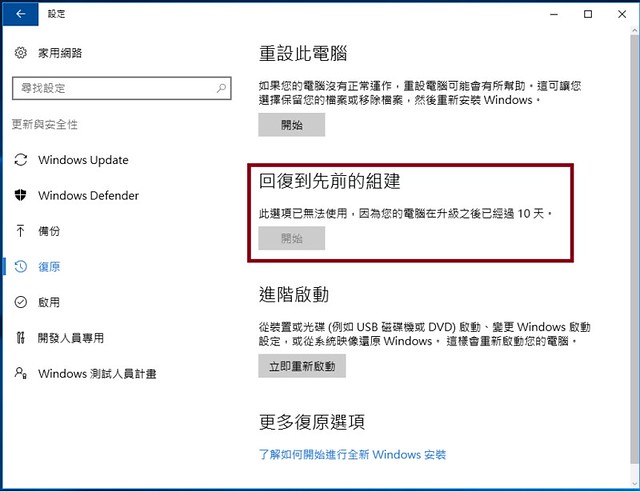
在網路上看見升級 1607 後,可以透過 Win10 內建回復,就很好奇去找找該設定,沒想到 ...........

原來升級為 1607 後可以透過內建功能回復,必須在 10 天進行,超過就不行啦

回復至先前組件-2

拿剛升級為 1607 的 PC 來看,會看到下圖

回復至先前組件-1

星期三, 9月 07, 2016

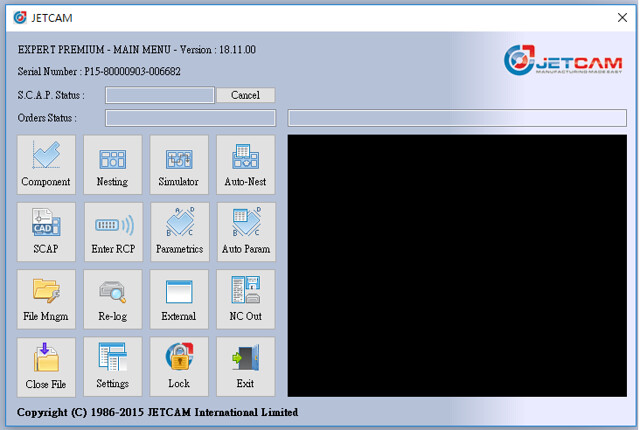
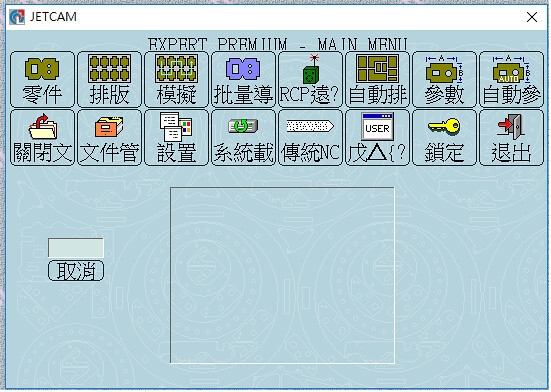
Jetcam 起始畫面

某台有安裝 Jetcam PC,突然要開始使用時才發現,為什麼執行的起始畫面跟現在 run 的差很多,直覺是當初有改過甚麼設定造成

Jetcam 網路版 V18 起始畫面,且中文翻譯通通都是亂碼

Jetcam 初始畫面-1

預期中該出現的起始畫面

Jetcam 初始畫面-2

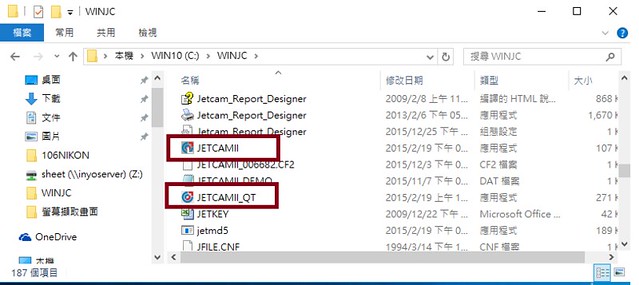
後來看到 Jetcam 執行檔案,才想到第一張圖是執行 JetcamII_QT 的畫面,我們都是用 JetcamII 執行檔來進行操作,換個執行檔就 OK

Jetcam 初始畫面-3

星期四, 9月 01, 2016

[C#] Microsoft Visual Basic Power Packs 3.0

要在 WinForm 上拉線條控件時才發現,為什麼沒有線條相關控件可以直接使用,Orz

Microsoft Visual Basic Power Packs 3.0 好像是從 VS 2008 SP1 開始內建,但在 VS 2013 又被拿掉,目前是使用 VS 2015,反正安裝就對啦,安裝完成後就可以在 .Net Framework 控件內找到相關控件

[C#] Microsoft Visual Basic Power Packs 3.0-1

線條總算是可以拖曳產生,>.<

[C#] DataGridViewComboBoxColumn 連動-2

星期三, 8月 24, 2016

[LINQ] 目標字串在文字內容出現次數

練習這篇 MSDN 文章 - How to: Count Occurrences of a Word in a String (LINQ)
namespace ConsoleApplication1
{
    class Program
    {
        static void Main(string[] args)
        {
            // 字串內容
            string text = @"Historically, the world of data and the world of objects" +
                @" have not been well integrated. Programmers work in C# or Visual Basic" +
                @" and also in SQL or XQuery. On the one side are concepts such as classes," +
                @" objects, fields, inheritance, and .NET Framework APIs. On the other side" +
                @" are tables, columns, rows, nodes, and separate languages for dealing with" +
                @" them. Data types often require translation between the two worlds; there are" +
                @" different standard functions. Because the object world has no notion of query, a" +
                @" query can only be represented as a string without compile-time type checking or" +
                @" IntelliSense support in the IDE. Transferring data from SQL tables or XML trees to" +
                @" objects in memory is often tedious and error-prone.";

            // 目標字串
            string SearchTarget = "data";

            // 目標字串出現在字串內容多少次
            int counts = text
                .Split(
                    new char[] { '.', '?', '!', ' ', ';', ':', ',' } , 
                    StringSplitOptions.RemoveEmptyEntries)
                .Where(word => word.ToLowerInvariant() == SearchTarget.ToLowerInvariant())
                .Count();

            Console.WriteLine($"{SearchTarget} 字串,在文字內容中出現 {counts} 次");
        }
    }
}
[LINQ] 目標字串在文字內容出現次數

星期日, 8月 21, 2016

[LINQ] 解析 csv 檔案

這篇 MSDN 文章 - 如何:重新排列有分隔符號的檔案中的欄位(LINQ) 是用 LINQ 來做,改成用 Lambda 方式來練習

原資料
Adams,Terry,120
Fakhouri,Fadi,116
Feng,Hanying,117
Garcia,Cesar,114
Garcia,Debra,115
Garcia,Hugo,118
Mortensen,Sven,113
O'Donnell,Claire,112
Omelchenko,Svetlana,111
Tucker,Lance,119
Tucker,Michael,122
Zabokritski,Eugene,121
namespace ConsoleApplication1
{
    class Program
    {
        static void Main(string[] args)
        {
            string[] lines = System.IO.File.ReadAllLines(@"D:\spreadsheet1.csv");

            var result = lines
                .Select(line => line.Split(','))
                .Select(s => new
                {
                    Col1 = s[2].ToString(),
                    Col2 = $"{s[1]} {s[0]}"
                })
                .OrderBy(c => c.Col1);

            foreach (var item in result)
            {
                Console.WriteLine($"{item.Col1} - {item.Col2}" );
            }
        }
    }
}

[LINQ] 解析 csv 檔案

星期五, 8月 19, 2016

[C#] DataGridView 和 ReadOnly 屬性

使用 DataGridView 都只針對 Columns 設定 ReadOnly,後來發現原來 Rows 和 Cells 也可以設定 ReadOnly,寫個小範例練習

Project:就都寫在一個 Form 內

[C#] DataGridView 和 ReadOnly 屬性-1

Form Layout:橘框內是對 DataGridView ReadOnly 選項設定的功能,FlowlayoutPanel 內的 CheckBox 則是利用 Code 動態產生

[C#] DataGridView 和 ReadOnly 屬性-2

星期三, 8月 17, 2016

[Win10] WinXP 連接 Win10 共享印表機

要從 WinXP 32bit 連接從 Win10 64bit 分享出來的 ZebraTLP 3842 標籤機簡易紀錄

以往連接分享印表機、標籤機設定的步驟,會遇上下面這個訊息
提供認證不足,無法存取這個印表機,你要指定新的認證嗎?
設定步驟如下
  • 選擇 [網路印表機或連接到其他電腦的印表機]
[Win10] WinXP 連接 Win10 共享印表機-1
  • 在連線到這部印表機選項內輸入 Win10 分享出來的標籤機
[Win10] WinXP 連接 Win10 共享印表機-2
  • 輸入 Win10 上事先建立好,列印專用帳號和密碼
[Win10] WinXP 連接 Win10 共享印表機-3
  • 出現認證不足訊息,就被擋在這邊
[Win10] WinXP 連接 Win10 共享印表機-4