星期五, 7月 29, 2016

[C#] DataGridView 範例 II

這篇 MSDN 範例 DataGridView 控制項範例,下面這段 Code 是用來保留使用者點選 CheckBox 紀錄,一直想不透這段語法存在的用意,在這篇筆記 [C#] DataGridView 範例 內就把它跳過
namespace Microsoft.Samples.Windows.Forms.DataGridViewSample
{
    partial class CustomerOrdersForm : Form
    {
        private System.Collections.Generic.Dictionary<int, bool> checkState;

        public void ShowDialog(string customerID, IWin32Window parent, IBindingListView blist)
        {
            // The check box column will be virtual.
            dataGridView1.VirtualMode = true;
            dataGridView1.Columns.Insert(0, new DataGridViewCheckBoxColumn());

            // Initialize the dictionary that contains the boolean check state.
            checkState = new Dictionary<int, bool>();

            // Show the dialog.
            this.ShowDialog(parent);
        }

        private void dataGridView1_CellValueNeeded(object sender, DataGridViewCellValueEventArgs e)
        {
            // Handle the notification that the value for a cell in the virtual column
            // is needed. Get the value from the dictionary if the key exists.
            if (e.ColumnIndex == 0)
            {
                int orderID = (int)dataGridView1.Rows[e.RowIndex].Cells["OrderID"].Value;
                if (checkState.ContainsKey(orderID))
                {
                    e.Value = checkState[orderID];
                }
                else
                    e.Value = false;
            }
        }

        private void dataGridView1_CellValuePushed(object sender, DataGridViewCellValueEventArgs e)
        {
            // Handle the notification that the value for a cell in the virtual column
            // needs to be pushed back to the dictionary.
            if (e.ColumnIndex == 0)
            {
                // Get the orderID from the OrderID column.
                int orderID = (int)dataGridView1.Rows[e.RowIndex].Cells["OrderID"].Value;

                // Add or update the checked value to the dictionary depending on if the 
                // key (orderID) already exists.
                if (!checkState.ContainsKey(orderID))
                {
                    checkState.Add(orderID, (bool)e.Value);
                }
                else
                    checkState[orderID] = (bool)e.Value;
            }
        }
    }
}
後來閱讀文章內容時,才發現到這段文字
使用虛擬模式,在排序時保留未繫結資料行中的值。
測試後才了解,原來未繫結資料行的值,經過排序後就會消失不見,所以才需要記錄下來,排序後再把資料補上去,測試結果如下圖

[C#] DataGridView 範例 II-1

星期四, 7月 28, 2016

[C#] DataGridView 範例

原本只是想找找 DataGridViewLinkColumn 資料來閱讀,沒想到發現 DataGridView 官方範例 - DataGridView 控制項範例,該文章 SampleCode 是切換到 2.0 版本才可以下載喔,拿它當範本來練習囉

Project
  • Form1 是主 Form
  • Form2 用來顯示明細資料
  • DataSource.Script 內有用到的 Sample Data 和 Store Prodecure
[C#] DataGridView 範例-3

Layout
  • Form1:一個 DataGridView
  • Form2:如下圖,DataGridView + ToolStripStatusLabel
[C#] DataGridView 範例-2

星期二, 7月 26, 2016

[C#] DataGridView - 計算欄位

在 VFP 中,只要直接在 Grid ControlSource 內填入計算式,就可以產生計算欄位資料,C# DataGridView 則是要 VirtualMode 搭配 CellValueNeed Event 來作到

Project
[C#] DataGridView - 計算欄位-1

C# Code
namespace DGVVirtualMode
{
    public partial class Form1 : Form
    {
        public Form1()
        {
            InitializeComponent();
        }

        private void Form1_Load(object sender, EventArgs e)
        {
            dataGridView1.AutoGenerateColumns = false;
            dataGridView1.AllowUserToAddRows = false;
            dataGridView1.DataSource = GetDataSource();

            dataGridView1.Columns.Add(
                new DataGridViewTextBoxColumn {
                    DataPropertyName = "N1",
                    Name = "Col1",
                    HeaderText = "數字欄位 1",
                    Width = 100,
                    Visible = true });

            dataGridView1.Columns.Add(
                new DataGridViewTextBoxColumn {
                    DataPropertyName = "N2",
                    Name = "Col2",
                    HeaderText = "數字欄位 2",
                    Width = 100,
                    Visible = true });

            // 計算欄位設為 ReadOnly 比較符合實務情況
            dataGridView1.Columns.Add(
                new DataGridViewTextBoxColumn {
                    DataPropertyName = "",
                    Name = "Col3",
                    HeaderText = "計算欄位",
                    Width = 100,
                    Visible = true,
                    ReadOnly = true });

            dataGridView1.VirtualMode = true;
            dataGridView1.CellValueNeeded += DataGridView1_CellValueNeeded;
        }

        private void DataGridView1_CellValueNeeded(object sender, DataGridViewCellValueEventArgs e)
        {
            if (e.RowIndex < 0) return;

            DataGridView DGV = sender as DataGridView;
            if (e.ColumnIndex != DGV.Columns["Col3"].Index) return;

            // 方法一:利用 DataGridView 取值
            e.Value = (int)DGV.Rows[e.RowIndex].Cells["Col1"].Value + (int)DGV.Rows[e.RowIndex].Cells["Col2"].Value;

            // 方法二:利用 DataTable 取值
            DataTable dt = DGV.DataSource as DataTable;
            e.Value = (int)(dt.DefaultView[e.RowIndex]["N1"]) + (int)(dt.DefaultView[e.RowIndex]["N2"]);
        }

        private DataTable GetDataSource()
        {
            DataTable dt = new DataTable();
            dt.Columns.Add("N1", typeof(int));
            dt.Columns.Add("N2", typeof(int));

            dt.Rows.Add(1, 1);
            dt.Rows.Add(2, 2);
            dt.Rows.Add(3, 3);
            dt.Rows.Add(4, 4);
            dt.Rows.Add(5, 5);

            return dt;
        }
    }
}
結果
[C#] DataGridView - 計算欄位-2

星期一, 7月 25, 2016

[C#] DataGridView 搭配 PictureBox 動態顯示圖片

這篇筆記 [C#] DataGridView - 字串路徑圖片 的作法是直接在 DataGridView 上顯示圖片,缺點是 DataGridView 資料因為 DataGridViewImageColumn 會拉的很長,且也不見得使用者需要看見每筆資料圖片,所以這篇就練習,一開始並不顯示圖片,當使用者需要時才把相片叫出來,且相片位置要顯示在該資料行上,算是這篇筆記的延伸 [C#] PictureBox 顯示圖片

簡單專案:就一個 Form

[C#] DataGridView 搭配 PictureBox 動態顯示圖片-1

Layout:左邊一個 DataGridView、右邊是 PictureBox

[C#] DataGridView 搭配 PictureBox 動態顯示圖片-2

星期六, 7月 23, 2016

[C#] DataGridView - 字串路徑圖片

閱讀這篇官方文章 如何:自訂 Windows Form DataGridView 控制項中的資料格式,練習在 DataGridView 上,顯示字串路徑圖片

利用 DataGridViewImageColumn 來顯示圖片,要在 CellFormatting Event 內,把字串路徑轉換為圖檔,並塞進 Cell 內

簡易專案,就通通寫在一個 Form 內

[C#] DataGridView - 字串路徑圖片-1

星期四, 7月 21, 2016

PowerPoint 轉 JPG 檔案

在 FB 上看見朋友提到 PowerPoint 可以轉 JPG 檔案,來了解一下

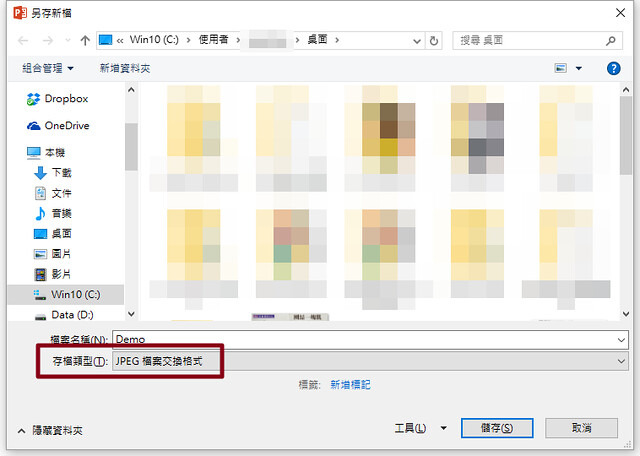
把製作好,檔案名稱為 dmeo 的 PowerPoint 另存新檔,存檔類別選擇 "JPEG 檔案交換格式"

PowerPoint 轉 JPG 檔案-1

詢問匯出選項,選擇 "所有投影片"

PowerPoint 轉 JPG 檔案-2

轉 JPG 成功訊息,但附檔名怪怪的,明明是轉到一個資料夾內,副檔名卻是 jpg

PowerPoint 轉 JPG 檔案-3

在 Demo 資料夾內就可以看到轉出的 jpg 檔案

PowerPoint 轉 JPG 檔案-4

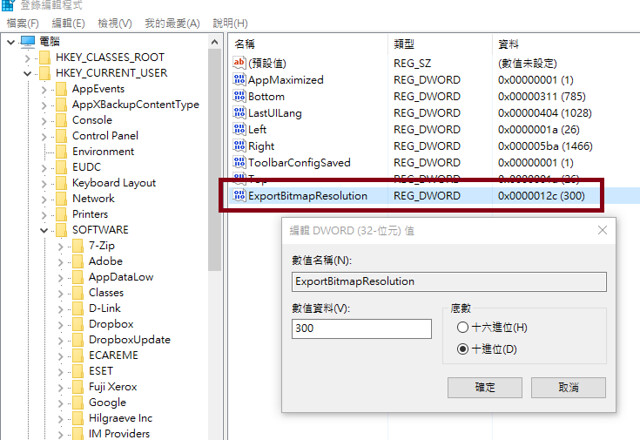
PowerPoint 轉 JPG 檔案,轉出的檔案預設是 96dpi,要更改成較高的解析度,要去機碼內進行設定,Orz

使用的是 Office 2013,機碼位置為 HKEY_CURRENT_USER\Software\Microsoft\Office\15.0\PowerPoint\Options 在這裡新增 ExportBitmapResolution 並輸入想要的 dpi 大小,詳見下圖,增加加碼 Step By Step 步驟,請參考 如何變更 PowerPoint 投影片的匯出解析度 官方文件

PowerPoint 轉 JPG 檔案-5

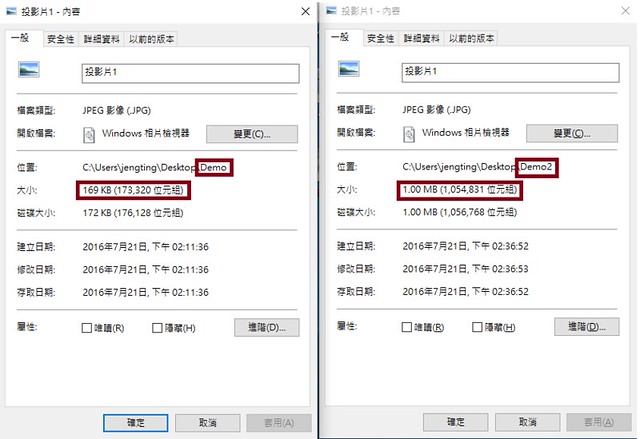
再次從 PowerPoint 轉 JPG 就可以看出 JPG 檔案的差異啦

PowerPoint 轉 JPG 檔案-6

官方文件中更改 dpi 限制
當您在 PowerPoint 中設定 ExportBitmapResolution 登錄值時,需要考慮到限制。根據投影片的最長邊緣,PowerPoint 可以匯出的最大解析度為 3072 像素。例如,標準 10 英吋 × 7.5 英吋投影片會有最大有效 DPI 值 307。3070 像素結果 (10 × 307 = 3070) 便會落在 3072 的限制內。不過,任何大於標準投影片 307 的 DPI 設定會回復成 3072 的限制。

星期三, 7月 20, 2016

AutoCAD 2008 LT 授權移轉

更換設計單位同事的 PC,OS 也從 Win7 換成 Win10,遇上 AutoCAD 授權移轉問題

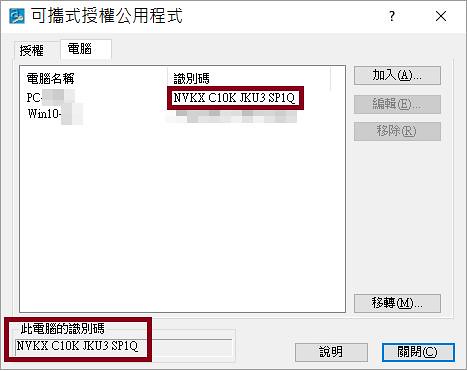
發現必須先在 Win7 授權程式內建立 Win10 PC 資料後,匯出的授權才能在 Win10 上匯入,下圖是遇上的疑問,建立 Win10 PC 資料時,有要輸入識別碼,詢問老大識別碼要輸入甚麼,久久才有機會做的動作,他第一時間也是傻眼,後來在 Win7 授權程式內發現,原來授權程式左下角就有識別碼,在 Win10 上執行授權程式,找出識別碼,再回來 Win7 上建立 Win10 PC 資料,完成授權移轉

AutoCAD LT 2008

印象中之前移轉也是我弄的,不過這次還是忘記怎麼移轉,還是紀錄一下好了

星期二, 7月 19, 2016

[C#] TreeView for WinForm

利用這篇紀錄 [C#] TreeView for WebForm 內的資料來練習 WinForm 的 TreeView

Project 內就一個 Form 而已


控件 Layout:左邊是 TreeView,右邊是 TextBox


C# Code
namespace TreeViewOrganization
{
    public partial class Form1 : Form
    {
        public Form1()
        {
            InitializeComponent();
        }

        private void Form1_Load(object sender, EventArgs e)
        {

            // 預設為 false
            treeView1.CheckBoxes = true;
            // 預設為 true
            treeView1.ShowLines = true;

            DataTable dt = GetTreeData();
            TreeBuild(dt);

            treeView1.ExpandAll();
            treeView1.AfterSelect += TreeView1_AfterSelect;
            treeView1.AfterCheck += TreeView1_AfterCheck;

            FocusOnRoot();
        }

        private void FocusOnRoot()
        {
            // TreeView 建置完成後,Focus 要出現在 Root 上
            this.treeView1.SelectedNode = this.treeView1.Nodes[0];
        }

        // 把點選 TreeNode 資訊顯示在 txtNodeInfo 裡
        private void TreeView1_AfterSelect(object sender, TreeViewEventArgs e)
        {
            StringBuilder sb = new StringBuilder();
            // 該階層索引值
            sb.AppendLine($"Index:{e.Node.Index}");
            // Name 必須在 TreeView 中是唯一的
            sb.AppendLine($"Name:{e.Node.Name}");
            // TreeNode 文字
            sb.AppendLine($"Text:{e.Node.Text}");
            // 備註說明,為 Object
            sb.AppendLine($"Tag:{e.Node.Tag}");
            // 父 TreeNode
            string Parent = e.Node.Parent == null ? "Root" : e.Node.Parent.Text;
            sb.AppendLine($"Parent:{Parent}");
            // 子節點數量
            sb.AppendLine($"Count:{e.Node.GetNodeCount(false)}");
            // 完整路徑
            sb.AppendLine($"FullPath:{e.Node.FullPath}");
            // 該 TreeNode Level 值
            sb.AppendLine($"FullPath:{e.Node.Level}");
            txtNodeInfo.Text = sb.ToString();
        }

        // 根據點選 TreeNode CheckBox 狀態,來變成子節點
        private void TreeView1_AfterCheck(object sender, TreeViewEventArgs e)
        {
            foreach (TreeNode ChildeNode in e.Node.Nodes)
            {
                ChildeNode.Checked = e.Node.Checked;
            }
        }

        // 對應資料來源 DataTable 的欄位索引
        private int IDColIndex = 0;
        private int ParentIDColIndex = 1;
        private int TextColIndex = 2;

        private void TreeBuild(DataTable dt)
        {
            TreeRootExist(dt);
            CreateRootNode(this.treeView1, dt);
        }

        private void TreeRootExist(DataTable dt)
        {
            EnumerableRowCollection<DataRow> result = dt
                .AsEnumerable()
                .Where(r => r.Field<string>(this.ParentIDColIndex) == null);

            if (result.Any() == false)
                throw new Exception("沒有 Root 節點資料,無法建立 TreeView");

            if (result.Count() > 1)
                throw new Exception("Root 節點超過 1 個,無法建立 TreeView");
        }

        private DataRow GetTreeRoot(DataTable dt)
        {
            return dt.AsEnumerable()
                .Where(r => r.Field<string>(this.ParentIDColIndex) == null)
                .First();
        }

        private IEnumerable<DataRow> GetTreeNodes(DataTable dt, TreeNode Node)
        {
            return dt.AsEnumerable()
                .Where(r => r.Field<string>(this.ParentIDColIndex) == Node.Name)
                .OrderBy(r => r.Field<string>(this.IDColIndex));
        }

        private void CreateRootNode(TreeView tree, DataTable dt)
        {
            DataRow Root = GetTreeRoot(dt);
            TreeNode Node = new TreeNode();
            Node.Text = Root.Field<string>(this.TextColIndex);
            Node.Name = Root.Field<string>(this.IDColIndex);
            tree.Nodes.Add(Node);

            CreateNode(tree, dt, Node);
        }

        private void CreateNode(TreeView tree, DataTable dt, TreeNode Node)
        {
            IEnumerable<DataRow> Rows = GetTreeNodes(dt, Node);

            TreeNode NewNode;
            foreach (DataRow r in Rows)
            {
                NewNode = new TreeNode();
                NewNode.Name = r.Field<string>(this.IDColIndex);
                NewNode.Text = r.Field<string>(this.TextColIndex);
                Node.Nodes.Add(NewNode);

                CreateNode(tree, dt, NewNode);
            }
        }

        private DataTable GetTreeData()
        {

            DataTable dt = new DataTable();
            dt.Columns.Add("DepID", typeof(string));
            dt.Columns.Add("ParentID", typeof(string));
            dt.Columns.Add("DepName", typeof(string));

            dt.Rows.Add("01", null, "公司");
            dt.Rows.Add("02", "01", "財務");
            dt.Rows.Add("03", "01", "行政");
            dt.Rows.Add("04", "03", "採購");
            dt.Rows.Add("05", "03", "人資");
            dt.Rows.Add("06", "03", "業務");
            dt.Rows.Add("07", "03", "技術服務");
            dt.Rows.Add("08", "01", "開發");
            dt.Rows.Add("09", "08", "企劃");
            dt.Rows.Add("10", "08", "品管");
            dt.Rows.Add("11", "01", "廠務");
            dt.Rows.Add("12", "11", "生產技術");
            dt.Rows.Add("13", "11", "製程保全");
            dt.Rows.Add("14", "11", "生產管理");
            dt.Rows.Add("15", "11", "廠務室 A");
            dt.Rows.Add("16", "15", "倉庫 A");
            dt.Rows.Add("17", "15", "板噴生產課");
            dt.Rows.Add("18", "17", "端板成型組");
            dt.Rows.Add("19", "17", "箱體塗裝組");
            dt.Rows.Add("20", "15", "熱交生產課");
            dt.Rows.Add("21", "20", "管件組");
            dt.Rows.Add("22", "20", "沖片組");
            dt.Rows.Add("23", "20", "回管組");
            dt.Rows.Add("24", "20", "氣焊組");
            dt.Rows.Add("25", "15", "裝配生產課");
            dt.Rows.Add("26", "25", "裝配一組");
            dt.Rows.Add("27", "25", "裝配二組");
            dt.Rows.Add("28", "11", "廠務室 B");
            dt.Rows.Add("29", "28", "倉庫 B");
            dt.Rows.Add("30", "28", "資材課");
            dt.Rows.Add("31", "28", "板金生產課");
            dt.Rows.Add("32", "31", "CNC 組");

            return dt;
        }
    }
}

星期一, 7月 18, 2016

[Win10] Gulim 字型

公司小姐跑來詢問,為什麼 Win10 內使用 Office,沒有 Gulim 字型可以使用,直覺是,這是甚麼鬼阿,Orz

MS 官網上發現,原來該字型從 Win10 開始,就不在內建,找台 Win7 把字型複製出來,再丟進 Win10 內

[Win] Gulim 字型

討論過程中才知道,有些資料,該單位主管指定要用該字型,soga

星期五, 7月 08, 2016

[C#] DataGridView - CheckBox 全選

實務上有該需求,希望 DataGridViewCheckBoxColumn 的 Header,能有個 CheckBox 來做到全部選擇、全部取消的功能,找了些文章來參考,在這整理記錄一下

[C#] DataGridView - CheckBox 全選-1

MyDGVCheckBoxColumnHeaderCell.cs
  1. 建立 CheckBoxAll Event
  2. 在 Paint 內繪出 CheckBox 並把相關資訊紀錄在 Property
  3. OnMouseClick 中根據 Property 資訊,判斷使用者是否有點擊到 CheckBox 並觸發 CheckBoxAll Event
using System;
using System.Drawing;
using System.Windows.Forms;
using System.Windows.Forms.VisualStyles;

namespace DGVCheckBoxAll
{
	public class MyDGVCheckBoxColumnHeaderCell : DataGridViewColumnHeaderCell
	{
		private Point _headerCellCheckBoxLocation;
		private Size _headerCellCheckBoxSize;
		private Point _headerCellLocation;

		public bool CheckBoxAllCheckedState { get; set; }

		public MyDGVCheckBoxColumnHeaderCell(bool defaultValue)
		{
			CheckBoxAllCheckedState = defaultValue;
		}

		protected override void Paint(
			Graphics graphics,
			Rectangle clipBounds,
			Rectangle cellBounds,
			int rowIndex,
			DataGridViewElementStates dataGridViewElementState,
			object value,
			object formattedValue,
			string errorText,
			DataGridViewCellStyle cellStyle,
			DataGridViewAdvancedBorderStyle advancedBorderStyle,
			DataGridViewPaintParts paintParts)
		{
			base.Paint(graphics, clipBounds, cellBounds, rowIndex, dataGridViewElementState, value, formattedValue, errorText, cellStyle, advancedBorderStyle, paintParts);

			// HeaderCellCheckBox 大小
			Size checkBoxSize = CheckBoxRenderer.GetGlyphSize(graphics, CheckBoxState.UncheckedNormal);

			// HeaderCellCheckBox 位置
			Point checkBoxLocation = new Point();
			checkBoxLocation.X = cellBounds.Location.X + (cellBounds.Width / 2) - (checkBoxSize.Width / 2);
			checkBoxLocation.Y = cellBounds.Location.Y + (cellBounds.Height / 2) - (checkBoxSize.Height / 2);

			// 把相關資訊記錄到 Property 上,方便後續使用
			_headerCellLocation = cellBounds.Location;
			_headerCellCheckBoxLocation = checkBoxLocation;
			_headerCellCheckBoxSize = checkBoxSize;

			CheckBoxState checkBoxState = CheckBoxAllCheckedState ? CheckBoxState.CheckedNormal : CheckBoxState.UncheckedNormal;
			CheckBoxRenderer.DrawCheckBox(graphics, _headerCellCheckBoxLocation, checkBoxState);
		}

		protected override void OnMouseClick(DataGridViewCellMouseEventArgs e)
		{
			// 變數 p 是指 Click 位置
			Point p = new Point(e.X + _headerCellLocation.X, e.Y + _headerCellLocation.Y);
			if (p.X >= _headerCellCheckBoxLocation.X &&
				p.X <= _headerCellCheckBoxLocation.X + _headerCellCheckBoxSize.Width &&
				p.Y >= _headerCellCheckBoxLocation.Y &&
				p.Y <= _headerCellCheckBoxLocation.Y + _headerCellCheckBoxSize.Height)
			{
				CheckBoxAllCheckedState = !CheckBoxAllCheckedState;
				OnCheckBoxAll(new CheckBoxAllEventArgs(CheckBoxAllCheckedState));
			}

			base.OnMouseClick(e);
		}

		public event CheckBoxAllEventHandler CheckBoxAll;
		protected virtual void OnCheckBoxAll(CheckBoxAllEventArgs e)
		{
			if (CheckBoxAll != null)
				CheckBoxAll(this, e);
		}
	}

	public class CheckBoxAllEventArgs : EventArgs
	{
		public bool CheckedState { get; set; }

		public CheckBoxAllEventArgs(bool checkedState = false)
		{
			CheckedState = checkedState;
		}
	}

	public delegate void CheckBoxAllEventHandler(object sender, CheckBoxAllEventArgs e);
}

星期二, 7月 05, 2016

[C#] DataGridView 顯示多行資料

DataGridView cells 顯示文字內容時都會變成下圖,變成一行資料,實務上是希望能夠顯示全部資料,方便使用者閱讀

[C#] DataGridView 顯示多行資料-1

可以透過設定 DataGridView DefaultCellStyle.WrapMode 和 AutoSizeRowsMode 來解決此問題

DataGridView => 編輯資料行 => 外觀分類 => DefaultCellStyle

[C#] DataGridView 顯示多行資料-3

配置分類 => WrapMode 設為 true

[C#] DataGridView 顯示多行資料-4

DataGridView AutoSizeRowsMode 設為 AllCells

[C#] DataGridView 顯示多行資料-5

設定效果如下

[C#] DataGridView 顯示多行資料-2

用 C# 語法直接進行設定
namespace WindowsFormsApplication1
{
    public partial class Form1 : Form
    {
        public Form1()
        {
            InitializeComponent();
            
            dataGridView1.AllowUserToAddRows = false;
            dataGridView1.AutoGenerateColumns = false;            
        }

        private void Form1_Load(object sender, EventArgs e)
        {

            // 針對某一個欄位設定
            dataGridView1.Columns[0].DefaultCellStyle.WrapMode = DataGridViewTriState.True;
            // 針對全部欄位進行設定
            dataGridView1.DefaultCellStyle.WrapMode = DataGridViewTriState.True;
            // 設定 AutoSizeRowsMode 屬性
            dataGridView1.AutoSizeRowsMode = DataGridViewAutoSizeRowsMode.DisplayedCellsExceptHeaders;

            DataTable dt = new DataTable();
            dt.Columns.Add("TextContent", typeof(string));

            StringBuilder sb = new StringBuilder();
            sb.AppendLine("111111111111111111111111");
            sb.AppendLine("222222222222222222222222");
            sb.AppendLine("333333333333333333333333");
            sb.AppendLine("444444444444444444444444");
            sb.AppendLine("555555555555555555555555");

            dt.Rows.Add(sb.ToString());
            dataGridView1.DataSource = dt;
        }
    }
}

星期六, 7月 02, 2016

[X.Andriod] 動態產生 Fragment

閱讀官方文章 Create a Fragment 後的練習筆記

[X.Andriod] 動態產生 Fragment-1

DynamicLayout.axml:只有一個 Button

[X.Andriod] 動態產生 Fragment-2
<?xml version="1.0" encoding="utf-8"?>
<LinearLayout xmlns:android="http://schemas.android.com/apk/res/android"
    android:id="@+id/linearDynamic"
    android:orientation="vertical"
    android:layout_width="match_parent"
    android:layout_height="match_parent"
    android:minWidth="25px"
    android:minHeight="25px">
    <Button
        android:text="動態載入"
        android:layout_width="match_parent"
        android:layout_height="wrap_content"
        android:id="@+id/btnDynamic" />
</LinearLayout>
DynamicFragmentLayout.axml:只有一個 TextView

[X.Andriod] 動態產生 Fragment-3
<?xml version="1.0" encoding="utf-8"?>
<LinearLayout xmlns:android="http://schemas.android.com/apk/res/android"
    android:orientation="vertical"
    android:layout_width="match_parent"
    android:layout_height="match_parent"
    android:minWidth="25px"
    android:minHeight="25px">
    <TextView
        android:text="Text"
        android:layout_width="match_parent"
        android:layout_height="wrap_content"
        android:id="@+id/txtDynamicCount"
        android:textSize="20dp" />
</LinearLayout>
DynamicActivity.cs
namespace FragmentsBase
{
    [Activity(Label = "FragmentsBase", MainLauncher = true, Icon = "@drawable/icon")]
    public class DynamicActivity : Activity
    {
        private int count = 0;

        protected override void OnCreate(Bundle savedInstanceState)
        {
            base.OnCreate(savedInstanceState);

            SetContentView(Resource.Layout.DynamicLayout);

            FindViewById<Button>(Resource.Id.btnDynamic).Click += (sender, e) =>
            {
                DynamicFragment dynamic = new DynamicFragment();
                dynamic.DynamicName = $"動態產生 Fragment - {count}";
                count++;

                FragmentManager
                    .BeginTransaction()
                    .Add(Resource.Id.linearDynamic, dynamic)
                    .Commit();
            };
        }
    }
}
DynamicFragment.cs
namespace FragmentsBase
{
    public class DynamicFragment : Fragment
    {
        public override void OnCreate(Bundle savedInstanceState)
        {
            base.OnCreate(savedInstanceState);
        }

        public string DynamicName { get; set; }

        public override View OnCreateView(LayoutInflater inflater, ViewGroup container, Bundle savedInstanceState)
        {
            View v = inflater.Inflate(Resource.Layout.DynamicFragmentLayout, null);
            v.FindViewById<TextView>(Resource.Id.txtDynamicCount).Text = this.DynamicName;
            return v;
        }
    }
}
[X.Andriod] 動態產生 Fragment-4

星期五, 7月 01, 2016

[X.Andriod] Application

Activity 之間傳遞參數,可以透過 Intent 來傳遞,但假如是共同參數,EX:使用者登錄資訊,可以透過自訂 Application,把參數放在 Application 內,來讓 Activity 來存取參數資訊

[X.Andriod] Application-1

自訂 Application
namespace ApplicationLogin
{
    // 一定要有 Application Attribute
    [Application]
    public class MyApplication : Android.App.Application
    {

        public string UserName { get; set; }

        public MyApplication(IntPtr javaReference, JniHandleOwnership transfer) : base(javaReference, transfer)
        {
            this.UserName = "Unkown";
        }

        public override void OnCreate()
        {
            base.OnCreate();
            Toast.MakeText(this, "執行 MyApplication", ToastLength.Long).Show();
        }
    }
}
Loginlayout.axml

[X.Andriod] Application-4
<?xml version="1.0" encoding="utf-8"?>
<LinearLayout xmlns:android="http://schemas.android.com/apk/res/android"
    android:orientation="vertical"
    android:layout_width="match_parent"
    android:layout_height="match_parent"
    android:minWidth="25px"
    android:minHeight="25px">
    <LinearLayout
        android:orientation="horizontal"
        android:minWidth="25px"
        android:minHeight="25px"
        android:layout_width="match_parent"
        android:layout_height="wrap_content"
        android:id="@+id/linearLayout1">
        <TextView
            android:text="使用者名稱:"
            android:layout_width="wrap_content"
            android:layout_height="match_parent"
            android:id="@+id/textView1"
            android:textSize="20dp"
            android:gravity="center" />
        <EditText
            android:layout_width="wrap_content"
            android:layout_height="match_parent"
            android:id="@+id/txtUserName"
            android:hint="請輸入使用者名稱"
            android:inputType="text" />
    </LinearLayout>
    <LinearLayout
        android:orientation="horizontal"
        android:minWidth="25px"
        android:minHeight="25px"
        android:layout_width="match_parent"
        android:layout_height="wrap_content"
        android:id="@+id/linearLayout3">
        <Button
            android:text="登錄"
            android:layout_width="wrap_content"
            android:layout_height="match_parent"
            android:id="@+id/btnLogin" />
    </LinearLayout>
</LinearLayout>
Layout1.axml:沒有任何控件
<?xml version="1.0" encoding="utf-8"?>
<LinearLayout xmlns:android="http://schemas.android.com/apk/res/android"
    android:orientation="vertical"
    android:layout_width="match_parent"
    android:layout_height="match_parent" />
LoginActivity.cs
namespace ApplicationLogin
{
    [Activity(Label = "ApplicationLogin", MainLauncher = true, Icon = "@drawable/icon")]
    public class LoginActivity : Activity
    {
        protected override void OnCreate(Bundle savedInstanceState)
        {
            base.OnCreate(savedInstanceState);
            SetContentView(Resource.Layout.Loginlayout);

            FindViewById<Button>(Resource.Id.btnLogin).Click += (sender, e) =>
            {
                MyApplication app = (MyApplication)this.Application;
                app.UserName = FindViewById<EditText>(Resource.Id.txtUserName).Text.Trim();
                this.StartActivity(typeof(Activity1));
            };
        }
    }
}
Activity.cs
namespace ApplicationLogin
{
    [Activity(Label = "Activity1")]
    public class Activity1 : Activity
    {
        protected override void OnCreate(Bundle savedInstanceState)
        {
            base.OnCreate(savedInstanceState);

            MyApplication app = (MyApplication)this.Application;
            Toast.MakeText(this, app.UserName, ToastLength.Long).Show();
        }
    }
}
執行 App

[X.Andriod] Application-2

在 Activity1 內把 MyApplication.UserName 資訊顯示出來

[X.Andriod] Application-3