星期四, 6月 30, 2016

[X.Andriod] Activity 回傳參數

這篇 [X.Andriod] Activity 傳遞參數 是紀錄從 Activity 丟參數到另一個 Activity 去,本篇記錄要從 Activity 呼叫 Activity 後,讓使用者進行操作並回傳操作結果

[X.Andriod] Activity 回傳參數-4

layout1.axml:兩個 Button,都是呼叫 Activity2

[X.Andriod] Activity 回傳參數-5
<?xml version="1.0" encoding="utf-8"?>
<LinearLayout xmlns:android="http://schemas.android.com/apk/res/android"
    android:orientation="vertical"
    android:layout_width="match_parent"
    android:layout_height="match_parent"
    android:minWidth="25px"
    android:minHeight="25px">
    <Button
        android:text="MS 產品"
        android:layout_width="match_parent"
        android:layout_height="wrap_content"
        android:id="@+id/btnMS" />
    <Button
        android:text="非 MS 產品"
        android:layout_width="match_parent"
        android:layout_height="wrap_content"
        android:id="@+id/btnNonMS" />
</LinearLayout>
layout2.axml:CheckBox 讓使用者勾選並確認回傳

[X.Andriod] Activity 回傳參數-6
<?xml version="1.0" encoding="utf-8"?>
<LinearLayout xmlns:android="http://schemas.android.com/apk/res/android"
    android:orientation="vertical"
    android:layout_width="match_parent"
    android:layout_height="match_parent"
    android:id="@+id/cbLayout">
    <CheckBox
        android:text="SQL Server 2016"
        android:layout_width="match_parent"
        android:layout_height="wrap_content"
        android:id="@+id/checkBox1"
        android:textSize="20dp" />
    <CheckBox
        android:text="Windows Server 2016"
        android:layout_width="match_parent"
        android:layout_height="wrap_content"
        android:id="@+id/checkBox2"
        android:textSize="20dp" />
    <CheckBox
        android:text="ASP.NET Core"
        android:layout_width="match_parent"
        android:layout_height="wrap_content"
        android:id="@+id/checkBox3"
        android:textSize="20dp" />
    <CheckBox
        android:text="Xamarin"
        android:layout_width="match_parent"
        android:layout_height="wrap_content"
        android:id="@+id/checkBox4"
        android:textSize="20dp" />
    <CheckBox
        android:text="Hyper-V"
        android:layout_width="match_parent"
        android:layout_height="wrap_content"
        android:id="@+id/checkBox5"
        android:textSize="20dp" />
    <LinearLayout
        android:orientation="horizontal"
        android:layout_width="match_parent"
        android:layout_height="39.0dp"
        android:id="@+id/linearLayout1">
        <Button
            android:text="確定"
            android:layout_width="wrap_content"
            android:layout_height="match_parent"
            android:id="@+id/btnOK" />
        <Button
            android:text="取消"
            android:layout_width="wrap_content"
            android:layout_height="match_parent"
            android:id="@+id/btnCancel" />
    </LinearLayout>
</LinearLayout>

星期三, 6月 29, 2016

[X.Andriod] 動態產生 CheckBox

練習在 LinearLayout 內動態新增 CheckBox,勾選時會顯示目前控件和全部控件狀態

[X.Andriod] 動態產生 CheckBox-1

DynamicAdd.axml 內只有一個 LinearLayout
<?xml version="1.0" encoding="utf-8"?>
<LinearLayout xmlns:android="http://schemas.android.com/apk/res/android"
    android:orientation="vertical"
    android:layout_width="match_parent"
    android:layout_height="match_parent"
    android:id="@+id/Layout" />
DynamicActivity.cs
namespace CheckBoxBase
{
    [Activity(Label = "DynamicActivity", MainLauncher = true)]
    public class DynamicActivity : Activity
    {
        protected override void OnCreate(Bundle savedInstanceState)
        {
            base.OnCreate(savedInstanceState);
            SetContentView(Resource.Layout.DynamicAdd);

            // 動態產生 CheckBox 
            LinearLayout layout = FindViewById<LinearLayout>(Resource.Id.Layout);
            for (int i = 0; i < 5; i++)
            {
                CheckBox cb = new CheckBox(this);
                cb.Text = $"Dynamic{i}";
                cb.CheckedChange += Cb_CheckedChange;
                layout.AddView(cb);
            }
        }

        private void Cb_CheckedChange(object sender, CompoundButton.CheckedChangeEventArgs e)
        {
            LinearLayout layout = FindViewById<LinearLayout>(Resource.Id.Layout);
            StringBuilder sb = new StringBuilder();

            sb.AppendLine($"目前勾選: {((CheckBox)sender).Text},狀態為:{e.IsChecked}");
            sb.AppendLine("---------------------------");
            sb.AppendLine("顯示全部 CheckBox 狀態");

            int ctls = layout.ChildCount;
            for (int i = 0; i < ctls; i++)
            {
                View v = layout.GetChildAt(i);
                if ((v is CheckBox) == false) continue;
                CheckBox cb = v as CheckBox;
                sb.AppendLine(cb.Text + "狀態為" + (cb.Checked == true ? "已勾選" : "未勾選"));
            }

            Toast.MakeText(this, sb.ToString(), ToastLength.Short).Show();
        }
    }
}
[X.Andriod] 動態產生 CheckBox-2

沒有 ofType() 可以使用就要多寫點 Code 來判斷是不是 CheckBox 控件

星期二, 6月 28, 2016

[SSMS] SSMS 和 Adobe Source Code

同事詢問,為什麼 SSMS 2014 中沒有辦法選擇 Adobe Source Code 字型,明明就有安裝字型檔案
  • SSMS 內找不到 Adobe Source Code 字型
  • Windows 內已經安裝 Adobe Source Code OTF 字型

確認同事安裝 OTF 字型後,第一時間是想說,那安裝 TTF 字型來看看好了,沒想到安裝 TTF 後,就可以正常使用
  • 安裝 TTF 字型後,就可以在 SSMS 內看見
  • Adobe Source Code 有推出兩種版本的字型格式
之前閱讀字型散步這本書時,有了解到字型格式有分 OTF 和 TTF,OTF 是現在的主流格式,沒想到 SSMS 反而不支援 OTF,Orz
  • 參考資料
  • 網路討論 12

星期一, 6月 27, 2016

[X.Andriod] 自訂 ListView

這篇官網文章內 Part 3 - Customizing a ListView's Appearance 有內建 ListView 的效果資料可以參考,實務上大概不會這麼幸運,直接套內建的就行,練習建立自訂的 ListView

[X.Andriod] 自訂 ListView-1

星期五, 6月 24, 2016

[X.Andriod] ListView - 基礎練習

ListView 基礎練習
  • 使用 Andriod 內建 Layout - SimpleListItem1 來呈現 ListView,Part 3 - Customizing a ListView's Appearance 該篇有內建 layout 的 ListView 執行效果可以看
  • ListView 資料來源,要設定 Adapter Property,常見 Adapter 為
    • ArrayAdapter - 該練習是使用它
    • SimpleAdapter - SimpleListItem2 會用到
    • BaseAdapter - 自訂 ListView 用
    • CursorAdapter - 搭配 SQLLite 會用上
  • 點擊 ListView 上的 Item 會觸發 ItemClick 事件
Main.axml:就放一個 ListView 控件
<?xml version="1.0" encoding="utf-8"?>
<LinearLayout xmlns:android="http://schemas.android.com/apk/res/android"
    android:orientation="vertical"
    android:layout_width="match_parent"
    android:layout_height="match_parent"
    android:minWidth="25px"
    android:minHeight="25px">
    <ListView
        android:minWidth="25px"
        android:minHeight="25px"
        android:layout_width="match_parent"
        android:layout_height="match_parent"
        android:id="@+id/listView1" />
</LinearLayout>
MainActivity.cs
namespace ListViewBase
{
    [Activity(Label = "ListViewBase", MainLauncher = true, Icon = "@drawable/icon")]
    public class MainActivity : Activity
    {

        protected override void OnCreate(Bundle bundle)
        {
            base.OnCreate(bundle);

            SetContentView(Resource.Layout.Main);

            List<string> data = new List<string>();
            data.Add("Xamarin");
            data.Add("SQL Server 2016");
            data.Add("Windows Server 2016");
            data.Add("Visual Studio 2015");
            data.Add("Visual Studio Code");
            data.Add("Azure");

            ArrayAdapter<string> source = new ArrayAdapter<string>(
                this, 
                Android.Resource.Layout.SimpleListItem1, 
                data);

            ListView list = FindViewById<ListView>(Resource.Id.listView1);
            list.Adapter = source;

            list.ItemClick += (sender, e) =>
            {
                Toast.MakeText(this, data[e.Position], ToastLength.Short).Show();
            };
        }
    }
}

[X.Andriod] ListView - 基礎練習

星期三, 6月 22, 2016

[X.Andriod] Activity 傳遞參數

簡易登錄介面,練習從 Activity 傳遞參數至一個 Activity,並把參數內容顯示出來

Project 內容
[X.Andriod] Activity 傳遞參數-3

星期二, 6月 21, 2016

[X.Andriod] EditText

看 Xamarin.Andriod 範例時,在 XML 內都有看見 EditText 控制項,可是在工具箱內就是找不到

[X.Andriod] EditText-1

後來才知道原來是 Text Fields 分類內的 Plain Text 控件

官網上看見兩個範例,整合在一起練習
[X.Andriod] EditText-3
<?xml version="1.0" encoding="utf-8"?>
<LinearLayout xmlns:android="http://schemas.android.com/apk/res/android"
    android:orientation="vertical"
    android:layout_width="fill_parent"
    android:layout_height="fill_parent">
    <EditText
        android:layout_width="match_parent"
        android:layout_height="wrap_content"
        android:id="@+id/txtInput"/>
    <TextView
        android:text="Text"
        android:layout_width="match_parent"
        android:layout_height="47.5dp"
        android:id="@+id/txtResult" />
</LinearLayout>
namespace EditTextPractice
{
    [Activity(Label = "EditTextPractice", MainLauncher = true, Icon = "@drawable/icon")]
    public class MainActivity : Activity
    {
        protected override void OnCreate(Bundle bundle)
        {
            base.OnCreate(bundle);

            SetContentView(Resource.Layout.Main);

            EditText txtInput = FindViewById<EditText>(Resource.Id.txtInput);
            TextView txtResult = FindViewById<TextView>(Resource.Id.txtResult);

            txtInput.TextChanged += (sender, e) => {
                txtResult.Text = e.Text.ToString();};

            txtInput.KeyPress += (sender, e) =>
            {
                e.Handled = false;
                if (e.KeyCode == Keycode.Enter)
                    Toast.MakeText(this, txtInput.Text, ToastLength.Short).Show();    
                e.Handled = true;
            };
        }
    }
}
[X.Andriod] EditText-2

星期日, 6月 19, 2016

[C#] 呼叫 NET TIME 校時

把這篇 [Win] NET TIME 內容,改成用 C# 來呼叫,進行校時
namespace ConsoleApplication1
{
    class Program
    {
        static void Main(string[] args)
        {
            System.Diagnostics.Process proc = new System.Diagnostics.Process();

            string ServerName = "Win2012R2";
            proc.StartInfo.UseShellExecute = true; // true 為預設值
            proc.StartInfo.FileName = "NET.EXE";
            proc.StartInfo.Arguments = @"TIME \\" + ServerName + " /SET /YES";

            // 用 Admin 權限執行該語法,但要注意 
            // Process.StartInfo.UseShellExecute = true (預設)狀態下,
            // Verb 才會有作用
            proc.StartInfo.Verb = "runas";

            proc.Start();
            proc.Close();
        }
    }
}

星期六, 6月 18, 2016

[Win] NET TIME

使用命令提示字元的  net time 語法,可以和目標 PC 進行校時。

命令提示字元內了解 net time 使用方法

[C#] 呼叫 NET TIME 校時-1

net time \\win2012r2,會顯示 win2012r2 系統時間

[C#] 呼叫 NET TIME 校時-2

net time \\win2012r2 /set,會顯示 win2012r2 系統時間外,會訊問是否要調整本機時間

[C#] 呼叫 NET TIME 校時-3

net time \\win2012r2 /set /y,會顯示 win2012 系統時間外,會直接把本機時間和 win2012r2 系統時間同步

[C#] 呼叫 NET TIME 校時-4

星期五, 6月 17, 2016

[Win] 輸入法字型大小

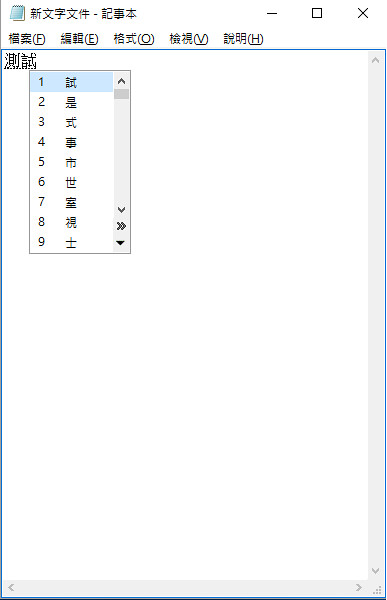
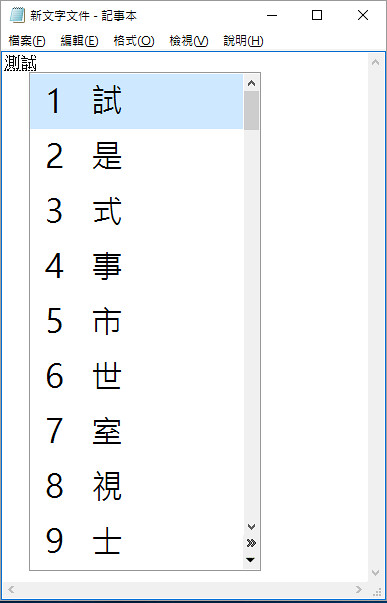
公司小姐跑來詢問,Win10 輸入法選字時的字型大小,可以放大嗎?直覺是不行,後來才查到,原來這個功能很早就有了

選字時,字型太小,閱讀上很吃力

輸入法字型大小-1

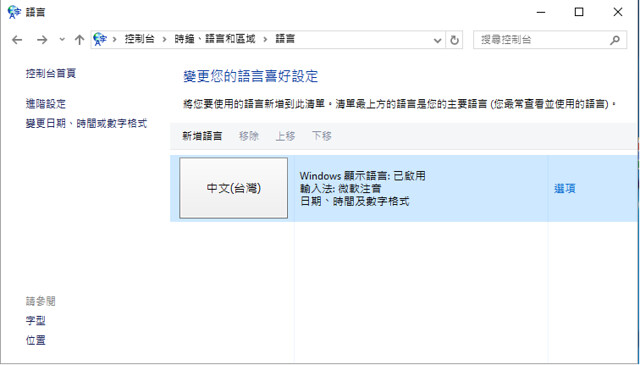
控制台 => 語言 => 選擇欲變更語法 => 選項

輸入法字型大小-2

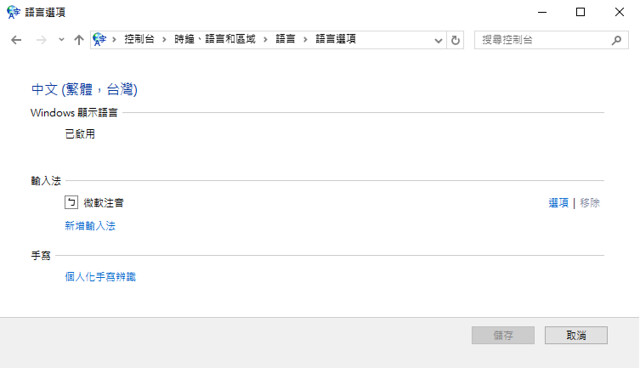
選擇輸入法 => 選項

輸入法字型大小-3

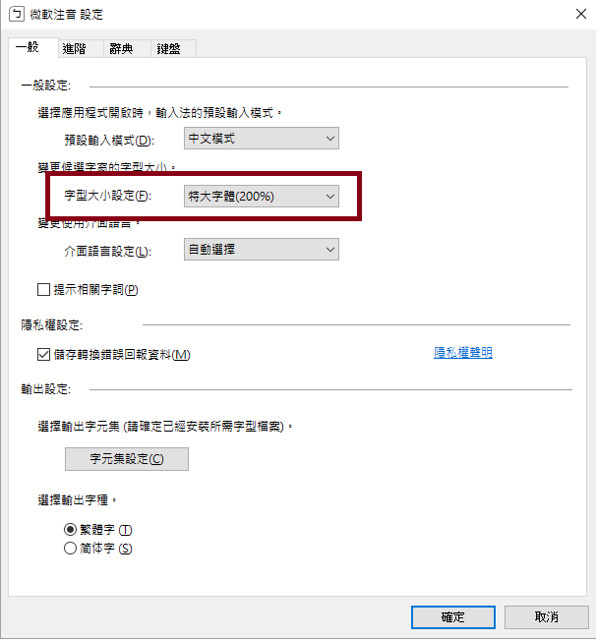
一般 Tag => 字型大小設定,預設是 100%,有 120% 和 200% 可以使用

輸入法字型大小-4

設成 200% 後,輸入法選字時的效果如下

輸入法字型大小-5

最後,小姐說,不能自行輸入放大比例喔,饒了我吧,^^'' ..

星期四, 6月 16, 2016

Zebra TLP 3842 共用

要把 XP1 上利用 USB 安裝的 Zebra TLP 3842 標籤機共用,分享給 XP2 使用,在 XP2 上安裝完成後測試頁可以正常輸出,新增 8X15 紙張設定後,只要在 XP2 上透過 ERP 系統列印,就會出現下面的錯誤訊息
明細 1 橫區段太大無法放入列印頁中。
但在 XP1 上列印卻是正常的,初步排除是程式造成,往兩台 XP SP3 PC 上標籤機設定來尋找問題點
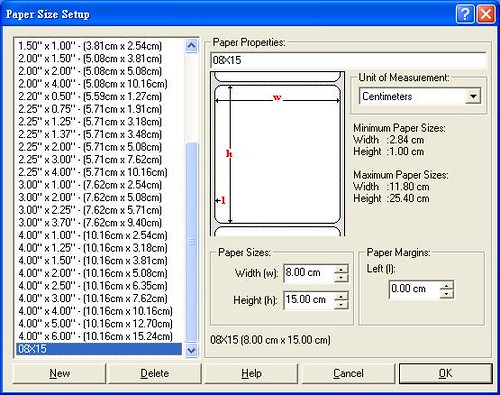
  • 檢查1:8X15 紙張設定是否一致
XP1 上的 8X15 紙張設定,XP2 上也完全一模一樣

Zebra TLP 3842 共用-1

  • 檢查2:1 標籤機 1 紙張設定
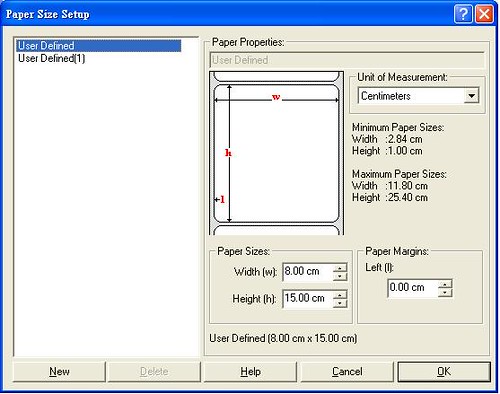
以往只要是標籤機,都會建立一台標籤機並且只有一張紙張設定,把內建紙張設定通通刪除,只留下自建的 8X15 設定,也是一樣情況,但發現但原來內建的 User Defined 紙張設定無法刪除
  • 檢查3:亂試
利用 User Defined 來列印標籤,沒想到報表預覽正常出現,當然大小是沒有 match 就是,把自訂 8X15 紙張設定,也改為 User Defined 設定,還是拋出錯誤,但是把 User Defined 紙張設定,改為 8X15,竟然就可以了

把 User Definded 改為 8X15 可以進行正常列印

Zebra TLP 3842 共用-3

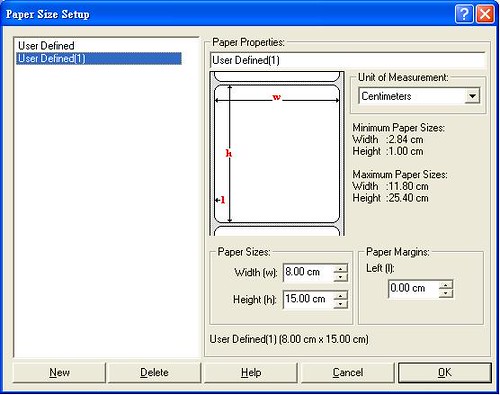
User Defined(1)是利用 New 建立出來的紙張設定,設定為 8X15,會拋出 Error,Orz

Zebra TLP 3842 共用-2

結論:就隨便找一個內建的紙張設定,直接改寬和高就可以使用,用 New 功能自行建立紙張設定,反而有問題,Orz

星期三, 6月 15, 2016

[IIS] 檔案伺服器分享

要利用 http://IPAddress/VirtualDir/FileName.jpg 來抓取檔案伺服器內圖檔,找了些資料來了解並實作看看,OS 為 Win2012R2,已事先安裝 IIS。

命令提示字元內確定 IPAddress

[IIS] 檔案伺服器分享-1

IIS 安裝完成後會有 Default Web Site 可以使用,新增虛擬目錄

[IIS] 檔案伺服器分享-2

建立虛擬目錄資料,C:\VirtualDir 為事先建立的目錄,且放進圖檔在裡面

[IIS] 檔案伺服器分享-3

VirtualDir 虛擬目錄建立完成

[IIS] 檔案伺服器分享-4

IE 中輸入 http://192.168.0.111/VirtualDir/Sample2.jpg 來顯示圖片

[IIS] 檔案伺服器分享-5

新增網站來測試看看

[IIS] 檔案伺服器分享-6

新網站 HelloWeb,實體路徑為事先已建立好資料夾,要特別注意 Default Web Site 預設是 80 port,Hello Web 要改為其他 port 來使用,在此設定為 8080

[IIS] 檔案伺服器分享-7

在 HelloWeb 內建立虛擬目錄 Demo,也是指向 C:\VirtualDir 內

[IIS] 檔案伺服器分享-8

IE 中輸入 http://192.168.0.111:8080/demo/Sample2.jpg 來顯示圖片

[IIS] 檔案伺服器分享-9

星期日, 6月 12, 2016

[C#] Parent 屬性

看到論壇討論才注意到,原來 WinForm 控件上,都有 Parent Property 可以呼叫,簡單紀錄一下

簡易測試:找 Label 的 Parent Property,並顯示在 Label.Text 上

WinForm Layout:放進三個 Label 控件和兩個 Panel 控件,Panel 有顯示外框來識別

[C#] Parent Property-2

C# Code
namespace ParentProperty
{
    public partial class Form1 : Form
    {
        public Form1()
        {
            InitializeComponent();
        }

        private void Form1_Load(object sender, EventArgs e)
        {
            label1.Text = FindParent(label1);
            label2.Text = FindParent(label2);
            label3.Text = FindParent(label3);
        }

        private string FindParent(Control ctl)
        {
            StringBuilder builder = new StringBuilder();
            Control loop = ctl.Parent;
            while (loop != null)
            {
                builder.AppendLine($"控件型別:{loop.GetType()} - 控件名稱:{loop.Name}");
                loop = loop.Parent;
            }
            return builder.ToString();
        }
    }
}
執行結果

[C#] Parent Property-1

星期三, 6月 08, 2016

[IIS] IP 位址及網域限制

了解 IIS 8.0 時,看網路文章都有 [IP 位址及網域限制] 功能可以使用,了解一下才發現,預設安裝 IIS 並不會安裝該功能,必須自行點選

網頁伺服器 (IIS) => 安全性 => IP 位址及網域限制

[Win] IIS 8.0 - IP 位址及網域限制-1

安裝完成後,就可以看見 IP 位址及網域限制 功能

[Win] IIS 8.0 - IP 位址及網域限制-2

try 看看,新增拒絕項目

[Win] IIS 8.0 - IP 位址及網域限制-4

拒絕 127.0.0.1 IP 連進 IIS

[Win] IIS 8.0 - IP 位址及網域限制-5

在 IE 內用 127.0.0.1 連線進 IIS,就可以看到設定結果

[Win] IIS 8.0 - IP 位址及網域限制-3

星期二, 6月 07, 2016

[X.Andriod] 從 Asset 來顯示圖片

查詢 ImageView.SetImageURI 語法時,查到 Visual C#與Xamarin跨平台行動App開發實戰 書籍內範例 - Asset 內圖片載進 Andriod 系統內,再把檔案顯示在 ImageView 內,就拿來練習囉

[X.Andriod] Asset-2

Main.axml
<?xml version="1.0" encoding="utf-8"?>
<LinearLayout xmlns:android="http://schemas.android.com/apk/res/android"
    android:orientation="vertical"
    android:layout_width="fill_parent"
    android:layout_height="fill_parent">
    <Button
        android:id="@+id/MyButton"
        android:layout_width="fill_parent"
        android:layout_height="wrap_content"
        android:text="讀取 Asset 圖片" />
    <TextView
        android:text="Text"
        android:layout_width="match_parent"
        android:layout_height="100.0dp"
        android:id="@+id/textView1" />
    <ImageView
        android:src="@drawable/xamarinicon"
        android:layout_width="match_parent"
        android:layout_height="match_parent"
        android:id="@+id/imageView1"
        android:layout_marginTop="0.0dp"
        android:layout_marginBottom="0.0dp" />
</LinearLayout>
[X.Andriod] Asset-3

MainActivity.cs
using System.IO;
using System.Text;

namespace ImageViewAssets
{
    [Activity(Label = "ImageViewAssets", MainLauncher = true, Icon = "@drawable/icon")]
    public class MainActivity : Activity
    {
        protected override void OnCreate(Bundle bundle)
        {
            base.OnCreate(bundle);
            SetContentView(Resource.Layout.Main);

            Button button = FindViewById<Button>(Resource.Id.MyButton);
            ImageView image = FindViewById<ImageView>(Resource.Id.imageView1);
            TextView text = FindViewById<TextView>(Resource.Id.textView1);
            button.Click += (Sender, e) =>
            {
                string TargetPath = @"DemoDir/DemoDir2";
                string[] result = Assets.List(TargetPath);

                // 產生隨機整數
                Random r = new Random(Guid.NewGuid().GetHashCode());
                int IndexID = r.Next(0, result.Length);

                string fileName = result[IndexID].ToString();
                string fileFullName = Path.Combine(TargetPath, fileName);
                string fileDriodFullName = Path.Combine(FilesDir.Path, fileName);

                StringBuilder builder = new StringBuilder();
                builder.AppendLine($"Aseet 檔案名稱:{fileName}");
                builder.AppendLine($"Asset 檔案完整路徑:{fileFullName}");
                builder.AppendLine($"Driod 檔案完整路應:{fileDriodFullName}");
                text.Text = builder.ToString();

                using (var stream = Assets.Open(fileFullName))
                using (var file = File.Create(fileDriodFullName))
                {
                    stream.CopyTo(file);
                }

                image.SetImageURI(Android.Net.Uri.Parse(fileDriodFullName));
            };
        }
    }
}
[X.Andriod] Asset-1
  • Asset
Asset 官方解釋
Assets provide a way to include arbitrary files like text, xml, fonts, music, and video in your application. If you try to include these files as "resources", Android will process them into its resource system and you will not be able to get the raw data. If you want to access data untouched, Assets are one way to do it.

Assets added to your project will show up just like a file system that can read from by your application using AssetManager.
原以為 Asset 會如同 Drawable 一樣可以透過 Reflection 來取得裡面的檔案,沒想到 Asset 不是 Class,Asset 內資料是存在 APK 內,要透過 AssetManager 來取得

星期一, 6月 06, 2016

[C#] XML Configuration File

對於 WinForm Project build 時,產生的檔案,一直沒有很認真注意過,反正通通放在一起程式就可以 run 啦。

撰寫完要釋出使用時,想說要把用不上的檔案刪除,免得搞的很凌亂,只留下 EXE 和 dll 相關檔案,然後悲劇就發生啦,Orz

下圖內的 get_IC_ConmnectionString 看起來就不是系統 method,有公司簡稱在名稱內,但是依據 StackTrace 去查,根本就沒有這個 method,想說不會是改來改去,造成 dll 引用錯亂啦,全部重新加入參考還是拋出相同的 Exception


發覺 build 後全部檔案都在時,可以正常執行,刪除用不上檔案後,才會拋出該 Exception,逐步過濾後發現 xxxERP.exe 檔案附檔名是 XML Configuration File,打開來看才恍然大悟,原來這個是 Configuration 檔案,連線字串都存在這阿。


謎之音:副檔名不就很明確指出是 Configuration 嘛,耍甚麼笨阿,科科

星期六, 6月 04, 2016

[VS] 在方案總管中追蹤現用項目

在大神的討論中看見有人提到該功能 - 在方案總管中追蹤現用項目


該功能就是點選上方的檔案 Tag,Solution 內會跳到該檔案,假如有多個 Project 的話,較容易找到該檔案在哪個位置


20210308 在 8 Hidden Visual Studio Features 發現,原來該設定假如沒有開啟的話,VS 2019 在 Solution 視窗上會有一個同步按鈕

  [VS] 在方案總管中追蹤現用項目-3